Painting Diary – Chronoscope – Sasha DuBois – part seven

Is that a Light I see before me?
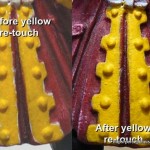
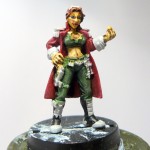
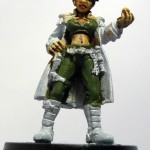
touch-up-comparisonI often find that with miniatures the end sneaks up on you, and it’s no different with Sasha.  One moment I was looking and thinking there was a lot of work ahead, and the next minute, she’s done.  Done in the sense that the main figure is done, the base is clearly not done, but I haven’t properly based a miniature for about 10 years since all I do when they’re finished is stick them in a foam box.  So, this is part seven in a seven or maybe eight part diary about painting Sasha DuBois (other parts are one, two, three, four, five, six).

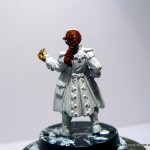
Yesterday (Saturday as I write this) we popped out after breakfast to Hobbycraft and Maplins and picked up a few things.  Some acrylic extender which I’ve been after for a while, a magnifying visor, a brush stand and a few other items.  Acrylic extender prevents the paint drying so quickly which is useful when it’s very thin, which in turn is very useful when using small brushes and detail work.  I tested the visor on a couple of other miniatures and then set about Sasha’s yellow bits.  The extender is really excellent, keeping the paint on the brush useful even when moving slowly with small amounts of paint, and the visor is good enough to let me see some real detail.  The picture just above shows the panels on the back of the figure before and after the second layer.  That layer was put on using the extender and the visor.  That was all that got done on the figure on Saturday.  There’s a few of photo’s of that stage after the cut …

Continue reading

Painting Diary – Chronoscope – Sasha DuBois – part six

The Devil is in the Detail

Light grey undercoat on cuffsThis is part six in an increasingly long painting diary for my Sasha DuBois miniature.  There were five parts before this, which you can get to in order from here, 1, 2, 3, 4, 5.  One of the most crucial things this diary has taught me is that no matter how good you think your painting is, no matter how well you think you covered an area, no matter how fine you think the line you just painted was, photographing it with a 7 megapixel camera and blowing it up will prove you wrong.  In some ways it’s quite handy, for example I’ve just come to the end of a session working on Sasha, and reviewing the photo’s shows me some places where I need to look a little harder and touch the various colours up a little bit.  I guess with a magnifying glass /visor I may be able to see that kind of detail, but when holding the miniature normally and painting it at the moment I can’t.

Continue reading

Painting Diary – Chronoscope – Sasha DuBois – part five

Cloak and not Dagger

First couple of washes go onThis is the fifth post in the Sasha DuBois painting diary set (the others are one, two, three and four).  I’m a bit up and down about my painting skill level at the moment (my regular normal state for anything I create), some days thinking I’m quite happy with my skill level thank you very much and other days a bit down because I feel I should be better, if I just spent a bit more time.  However, I spend as much time as I spend and I enjoy that time and at the end of the day that’s what truly matters, it’s relaxing and enjoyable.  I’m happy with being slightly better than barely average (at the moment).

At the end of the fourth post I’d just put the base coat onto the coat (this could get confusing), using scab red.  I then spent a little while (a few days) not really painting anything, and finally got back into the swing by putting a lot of effort into the zombies.  I also managed to wash and brush the coat on this mini and then put some black onto the boots (too thickly, sigh).  Anyway.

Continue reading

Painting Diary – Chronoscope – Sasha DuBois – part four

Fancy Pants

This is the fourth diary entry in the ‘Painting Sasha DuBois’ series, parts one, two and three can be found by the simple click of a mouse.

First base coat of trousers and topWith some miniatures (for example, a zombie army you use for gaming) it’s entirely possible to make yourself get on and paint them.  The technique is different, you’re trying to paint them reasonably quickly, and it’s not likely anyone’s going to be inspecting them individually from 12 inches away, but they have to look good at distance as a unit on the playing surface.  So you can forgive yourself short-cuts and missed lines and broad brush strokes (as it were).  However, when I’m painting a miniature I like, and I really want to look good I have to be careful not to make myself progress, because I find that I lose the spark that makes me care about the detail.  If I push it too hard, it ends up looking rushed.  So I barely touched Sasha when I sat down a couple of nights ago (hence the short part three post) and although I’ve made more progress again it’s slow going.

I’d just spent a day painting a mini with blue and scab red and wanted to avoid that exact combination, but I knew I wanted to do Sasha’s coat in the red because it just looked so cool when washed / brushed.  So I went for green on the trousers and top as a nice contrast.  In the past I’ve made the mistake of starting with a base layer that’s too dark.  The issue there is that the wash makes little difference or you have to use a black wash to get any result, and then any amount of dry brushing is just too severe.  So, this time I went with a lighter green base coat with a plan to wash that with a dark green to give it some depth.  I was in two minds about starting with the trouser layer, there’s a tricky bit of work between her legs (no sniggering) where the coat shows through.  There’s a good argument to be made for doing the coat first, since it’s slightly easier to work on the legs and not hit the cloak.  However, if you put a green wash on the legs there’s a chance it’ll run onto the back of the coat, but when you wash the coat due to the layout of the model it’s very unlikely to run onto the legs.  So I went with legs first.

Continue reading

Painting Diary – Chronoscope – Sasha DuBois – part three

Best laid plans

First base coatI planned to work on the major clothing areas on the Sasha piece after finishing the eyes for the third part in the diary painting thing (part one here, part two here).  However, if you read my post on inspiration then you’ll know I ended up doing Sasha’s hair.  Hair is one of those funny things, although we talk about it being black or brown or blonde or red, it’s really not those colours and it’s very hard to just simply paint hair.  Harder than you might imagine, so when I find a colour combination that works I’m really quite happy.

While painting the deadly hammer wielding nun in the inspiration article I found that one of the brown paints in the new paint set is really good as a base hair colour, which I then wash with a brown wash and dry brush highlights onto.  It’s really effective.  So once I’d got it looking nice on the nun, I picked up Sasha and did her hair.  That’s it, that’s all I got painted on her in this session.  Sometimes that’s the way it goes, I’ll paint huge areas and get loads done (if I’m inspired) or each section will be a real chore forcing me to keep going (if inspiration is a little lacking that day).

Hair after wash and dry-brushSo, Sasha got her hair sorted, hopefully soon she’ll get some clothing as well.  Her clothes really are quite interesting with multiple layers and lots of scope so I’m quite excited about painting them, but I’m also concerned I’ll screw them out, so I’m probably going to try and get into a bit of a groove by working on other miniatures first / as well.  I find that I get better and re-learn things after a long time away and that a few weeks in my hand is a lot steadier.

Fingers crossed.

You can check out part four here.

Painting Diary – Chronoscope – Sasha DuBois – part two

The eyes have it

First thin layer of flesh tone paintThis is the second part in a series of articles covering the progress of a single miniature painting job (Sasha DuBois, Time Chaser).   In the first article I covered the basic preparation of the miniature.  In this article I show you how I can take a perfectly good miniature and ruin it from the outset with a hack skin and face job.  Rather than just include a long line of images near the end, I’ll scatter them throughout the paragraphs, each one has a title which should let you know which stage it’s at.  For full pictures and descriptions you can still check out the Picasa web album.

Once I’d prepared the figure I had a think about basic colour schemes and skin tone.  I’m really uncomfortable painting much other than ‘sun beaten caucasian’ skin, I’ve tried a range of colours in the past from the realistic to the fantastical and either my technique doesn’t suit them or I’m just not able to convert what I see in my head into colour choices and colour application on the final figure, so I went with my traditional skin colour choice.  For the rest of the figure I want something bold and colourful, this is a steampunkish / sci-fi figure and I really want it to be vibrant.

Continue reading

Painting Diary – Chronoscope – Sasha DuBois – part one

Introduction

Figure in blister packI wanted to paint something and I also wanted to write some reasonably lengthy and meaty blog posts, so I thought it made sense to combine the two things.  Welcome then to my first painting diary where I’ll cover the process I followed to paint Reaper Miniatures’ Sasha DuBois (part of their Chronoscope line).  The whole article is split up into several parts, and this is part one.

It’s worth saying what this series of articles is not.  They’re not a guide on how to paint, they’re not an example of the right way to paint, they’re not about how you should paint.  What it is, is purely a diary about how I painted this specific miniature.  At the moment, I’ve got no idea how the figure will turn out, I may ruin it, I may give up half way through, I may finish it and hate it, or complete it and be really proud of it.

Along with the blog posts I’ll be updating a Picasa web album with all the photo’s I take.  You can check out all the photo’s in the on-line gallery here.

I was going to track the progress of a space marine I got (for free!) when I bought some paint, because it would be something totally different for me.  I’ve never painted a space marine, I don’t usually paint sci-fi miniatures, it’s male, and it’s fully clothed.  However, I eventually decided at least for my first painting diary (on this platform) that I’d stick partially to form.  Hence the figure is female and is at least partially naked (bare midriff), however it is at least a sci-fi miniature.  So, here we go.

Continue reading