SSH tunnelling made easy (part four)

The first three parts of this series (one, two, three) covered using SSH to tunnel across various combinations of firewalls and other hops in a forward direction.  By that, I mean you are using computer A and you’re trying to get to something on computer B or computer C.  There is another type of problem that SSH tunnels can solve.  What if you’re running a service on computer A but you can’t get to it because your network doesn’t allow any incoming connections?  Maybe it’s a home server behind a NAT router and you can’t / don’t want to poke holes in the firewall?  Maybe you’re in a cafe and no one can connect to your machine because the free wireless doesn’t allow it, but you want to share something on your local web server?

In those situations, you need reverse tunnels (or remote tunnels).  There’s nothing magical about them, they just move traffic in the other direction while still being initiated from the same starting location.

Example 4 – reverse tunnel web server

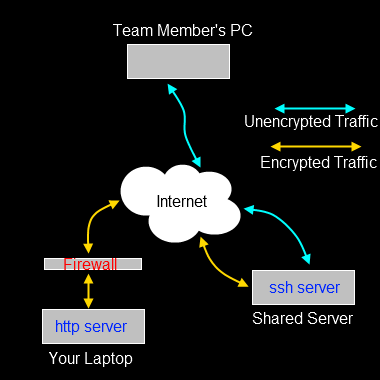
In this example, we’ll use a reverse web tunnel to enable access to a host for which incoming connections are entirely blocked.  You’re sitting with your laptop in a cafe, doing some work, and you want to show some team mates the new web site layout.  Rather than having to check the code out to a public web server, you can just allow access to the web server you run on your local machine.

The assumption here is that you can SSH into the Shared Server and that your team mate can connect to the SSH server with their web browser.

Your team mate can’t browse to the web server on your laptop, because the cafe firewall quite sensibly gets in the way.  What we need is a way to allow traffic from the SSH server into your laptop.

From your laptop, you create a reverse / remote tunnel (note -R, rather than -L),

ssh -R 203.0.113.34:9090:127.0.0.1:80 fred@203.0.113.34

I’ve used IP addresses in the tunnel so you can see what is going on.  With regular tunnels, the first IP address and port are the local machine.  With reverse tunnels, they are the interface and port on the remote server that are listening for traffic, the second IP address and port are the ones on the local machine to which that traffic is routed.  So our reverse route above connects to the ssh server (203.0.113.34) and starts listening on that network interface (203.0.113.34) port 9090.  Any traffic it gets on that port is routed over the tunnel into 127.0.0.1 port 80 (i.e. your local machine, port 80).

Your team mate can now point their browser at 203.0.113.34:9090 and will actually see the web server on your laptop.  Because you created an outgoing connection through the firewall with the tunnel, the firewall is none-the-wiser, it simply sees regular SSH traffic flowing to and from the SSH server.

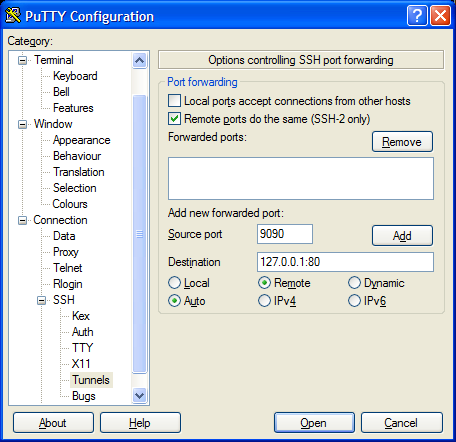
In PuTTY the setup would look like this,

The Remote ports option needs to be ticked so that the tunnel will listen to external interfaces on the target machine.

NB: In order to get reverse (or remote) tunnels working in this way, you need to ensure the SSH server to which you connect supports the feature.  For OpenSSH that means you need to enable the ‘Gateway Ports’ open in the sshd_config file.

SSH tunnelling made easy (part three)

In the previous two parts of this series, I covered simple tunnels to access services you couldn’t reach, and tunnels which let you hop from one server to another on an otherwise unreachable network.  In this article I’ll cover a powerful feature of SSH, the ability to provide port forwarding via the SOCKS mechanism.

SOCKS is a standard method to allow clients to connect to services via a proxy server.  SSH can turn any computer you can connect to (over SSH) into a proxy server for you, and you alone (so it’s secure).

Example 3 – using SOCKS proxy to access multiple services on a network via a secure server

There are several different reasons why you may need to employ SSH to deliver a SOCKS proxy.  Two common reasons are if you’re connected to a public network you don’t trust (like a cafe Wi-Fi network), or if you want to get to a range of services inside a secured network to which you only have SSH access.

Since the process is identical in both cases, I won’t cover them separately.

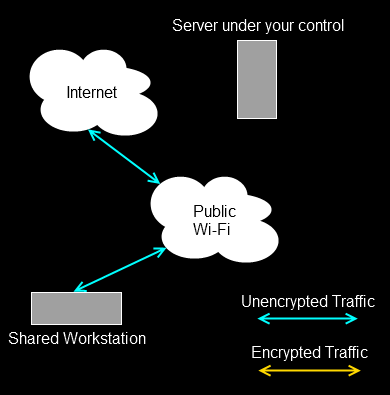
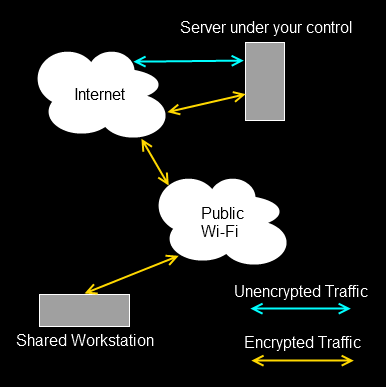
The diagram below shows a shared workstation (maybe in a library) connected to a public Wi-Fi network.  You can’t trust the network, anyone could be intercepting unencrypted traffic on it.

There is however a sever somewhere to which you have SSH access (and which in theory, you control and so trust).  What you would like to do is browse several websites or connect to some other SOCKS supporting services, without anyone on the public Wi-Fi being able to intercept that traffic.  If you were only connecting to a single service you could use simple tunnelling as per the previous two examples, but this time, you want to browse a few websites, and it’s not sensible to try and create a tunnel for each one.  In this instance, you use SSH to set up a dynamic tunnel, which provides a SOCKS proxy.

The command is even easier.

ssh -D 127.0.0.1:9090 fred@shell.example.net

Similar to the previous commands, but you’ll notice there is no target destination, only a listening address and port.  The -D tells SSH to listen on 127.0.0.1 port 9090 in this case, and operate as a SOCKS proxy, starting at the server you’ve connected to.

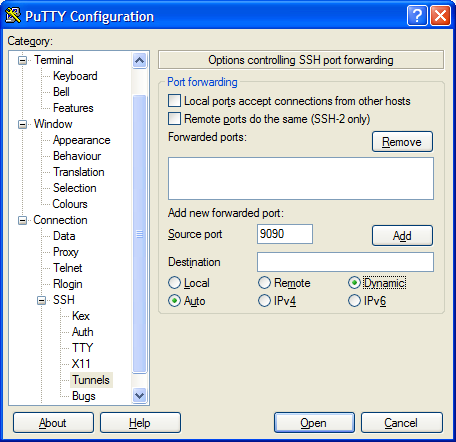
In PuTTY you would configure this as below,

Note that the destination address is left blank.

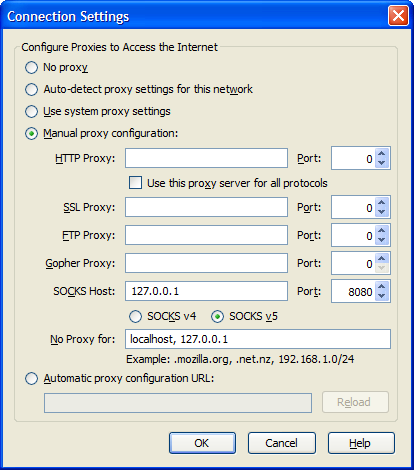
In order to use this tunnel, you need to do a little more work than previously.  Assuming we’re going to use it primarily for web browsing, you would need to tell your web client to use a SOCKS proxy.  In Firefox, you would configure it like this,

Now, when you try and browse anything in Firefox, it sends the requests to what it believes is a SOCKS proxy server (127.0.0.1, port 9090).  That’s really your SSH connection to shell.example.net.  At the other end, your SSH connection sends the data on to the correct web server, receives it, and passes it back to your workstation and into Firefox.

The net result (pun intended) results in a diagram which looks like this.

So your browsing is secure as far as the Public Wi-Fi is concerned.  SOCKS supports a number of different protocols, and different clients are configured in different ways.  But as long as your tool supports SOCKS, you can point it at the 127.0.0.1 9090 server, and it will work as above.

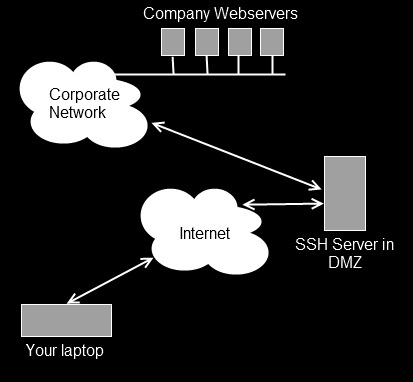
SOCKS via SSH is extremely powerful.  Here’s a further diagram of another situation where you may want to use it.

Your company has a number of web servers internally which provide time recording, project planning and other information.  While working away from the office you need to access those services.  There are too many to set up individual tunnels.  There is an SSH server in the company’s control which can be reached from the Internet.  Using the -D option, you can turn that server into your own SOCKS proxy and browse to the company web servers to complete your work.

While not intended as a replacement for a VPN (mainly because it only really supports a subset of network protocols), this SOCKS implementation is very useful.

SSH tunnelling made easy (part two)

In part one of this set of posts, I covered using SSH tunnelling to access a service on a server, from a particular machine that can SSH to the target server, but not access the service directly (due to firewalls or sensible security reasons).  In this post, I’ll cover a three computer scenario.

Example 2 – three computers – can’t access third server directly

This situation covers a few different scenarios.  Perhaps you can SSH to a server in a DMZ (i.e. firewalled from all sides), and from there you can SSH to another server, or perhaps access a website on another server, but you can’t get directly to that server from your computer (you always have to use the middle hop).  Maybe you want to interrogate a web management GUI on a network switch which is connected to a network you’re not on, but you can SSH to a machine on the same network.  There are plenty of reasons why you might want to get a a specific service, on Server 2, which you can’t access directly, but you can access from Server 1, which in turn you can SSH to from your local computer.

The process is identical to the steps followed in the first example, with the only significant difference being the details in the SSH command.  So let’s invent a couple of different scenarios.

Scenario 1 – remote MySQL access

In this example, your web server (www.example.net) provides web (port 80) and ssh (port 22) access to the outside world, so you can SSH to it.  In turn you have another server on the same network as your web server (mysql.example.net) which handles your MySQL database.  Because your sysadmin is sensible, mysql.example.net is behind a software firewall which blocks all remote access except for MySQL and SSH access from www.example.net.

So your workstation can’t SSH to mysql.example.net and hence you can’t use the simple example in the previous article.  You can SSH to www.example.net but you can’t run the GUI up on that computer.  So you need a way to tunnel through to the third machine.  I’ll show you the command first, and it will hopefully be obvious what’s going on.

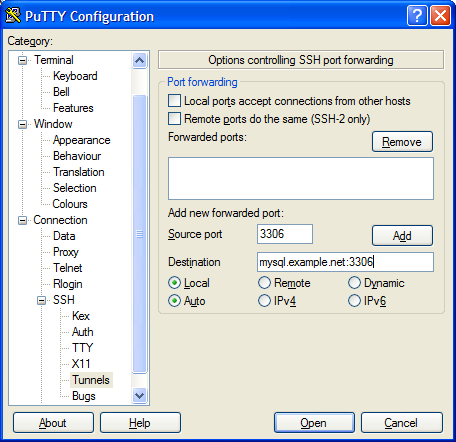
ssh -L 127.0.0.1:3306:mysql.example.net:3306 fred@www.example.net

So as before, we open the tunnel by connecting to www.example.net as fred via SSH.  The tunnel we are creating starts on our local machine (127.0.0.1) on port 3306.  But this time, at the other end, traffic ejected from the tunnel is aimed at port 3306 on the machine mysq.example.net.  So rather than routing the traffic back into the machine we’d connected to via SSH, the SSH tunnel connects our local port, with the second server’s port using the middle server as a hop.  There’s nothing naughty going on here.  SSH is simply creating an outbound connection from www.example.net to mysql.example.net port 3306, and pushing into that connection traffic it is collecting from your local machine.

Once the tunnel is in place, you would start up the MySQL GUI exactly the same as previously, filling 127.0.0.1 as the ‘server’, and the correct credentials as held by mysql.example.net.  SSH will pick up the traffic, encrypt it, pass it over port 22 to www.example.net, un-encrypt it, and then pass it to port 3306 on mysql.example.net, and do the same in reverse.

The only difference between this and the example in part one, is the destination for our tunnel.  Rather than telling SSH to talk back to the local address on the server we connect to, we simply tell it which server we want to connect to elsewhere in the network.  It’s no more complex than that.

Here’s the setup for PuTTY.

Scenario 2 – network switch GUI

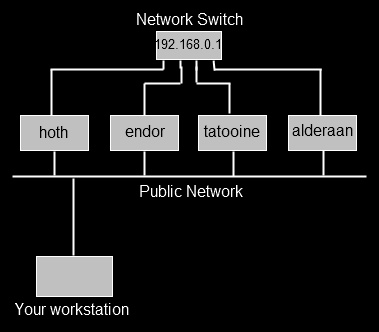
Maybe you support a set of servers which you can SSH to, but which also have their own private network running from a switch that itself isn’t connected to the public network.  One day you need to use the web GUI on the switch (perhaps management have asked for a screenshot and they don’t understand why you sent them an ssh log file first time around) which runs over port 80.

So, we can ssh as user fred to say, the server endor using ssh fred@endor.  We can’t connect to our network switch (192.168.0.1) from our own workstation, but we can from endor.  What we need to do is create a tunnel from our machine, which goes to endor, and then from endor into port 80 on the switch.  This time, we won’t use port 80 on our local machine (maybe we’re already running a local web server on port 80), we’ll use port 8000.  The command therefore is this,

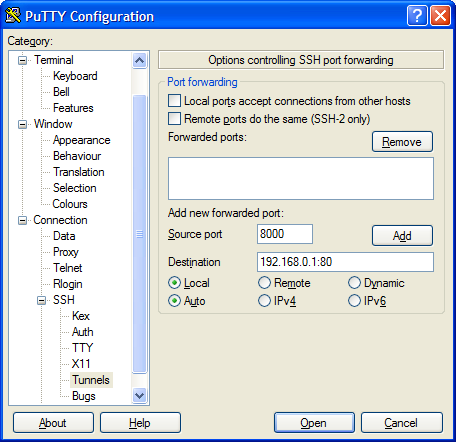
ssh -L 127.0.0.1:8000:192.168.0.1:80 fred@endor

So, make SSH listen locally (127.0.0.1) on port 8000, anything it sees on that port should be sent over port 22 to endor, and from there, to port 80 on 192.168.0.1.  SSH will listen for return traffic and do the reverse operation.

This is how that looks in PuTTY.

Once we’ve connected to endor, and the tunnel is in place, we can start a web browser on our own local machine, and tell it to go to the url,

http://127.0.0.1:8000

At that point, SSH will see the traffic and send it to the network switch, which responds, and the tunnel is in place.

Once again, this process works for all simple network protocols such as POP3, SMTP, etc.

SSH tunnelling made easy (part one)

SSH tunnelling is powerful and useful.  If you can get your head around networking and ports it’s pretty easy to set up, but it’s one of those things that either sticks or doesn’t, and it’s easier to work out when you’ve got a specific problem to solve by using it.  I personally use Cygwin under Windows and so my tunnelling is done using the command line OpenSSH client, however I used to use PuTTY which will do tunnelling as well, and there are plenty of other options.  If you’re already on a UNIX-like setup with OpenSSH then the same command line options are valid as for the Cygwin version.

I wanted to run through some simple examples, and then show how the tunnelling is configured to support them and what actually happens.  But first, a general statement.  SSH tunnelling allows you to make a connection from your local computer, to a service on another computer than your local computer can’t get to directly, via a computer you can get to over SSH.  That includes a two machine situation where you want to get to service X on a computer but can’t because of say a firewall, but you can SSH to the very same machine.  It also includes a three computer scenario where you hop from a middle computer to a computer it can access but you can’t.

Example 1 – two computers – can’t access service directly

So in this example, we have your local computer (your laptop for example, but this could be any computer you are logged on to), and a remote web server.  The web server has MySQL installed but the sensible sysadmin has ensured it’s only listening to local connections so that evil people can’t connect to it and do bad things.  You want to use a nice MySQL GUI you’ve got (say MySQL Query Browser) but can’t connect.

We assume for this example that you have a shell account on your web server with the username of fred.  What you need to achieve, is to let software running on your workstation access a local port, which SSH then picks up, shoves across to the remote server, and dumps onto the local port at that end (i.e. a tunnel).  To keep things easy, we’ll use the same local port on our workstation that MySQL is listening on at the other (3306) end but you don’t have to.

In plan English then, we need to convince SSH to listen for stuff on our workstation arriving on port 3306, tunnel that across to our server, and pass it to the local port 3306 over there, and bring back any traffic in the opposite direction.  To achieve that, SSH has to make a connection over it’s own regular port first, and then it sets things up.

The OpenSSH command line to achieve this is,

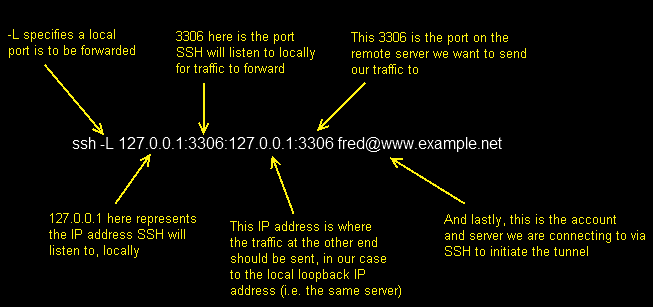
ssh -L 127.0.0.1:3306:127.0.0.1:3306 fred@www.example.net

That’s the long hand version, you might see that written as,

ssh -L 3306:127.0.0.1:3306 fred@www.example.net

or

ssh -L 3306:localhost:3306 fred@www.example.net

They will all work and achieve the same thing, but the long hand version for me, is the easiest to take and apply elsewhere.  So reading it, you get the following.

Using PuTTY you would set up a normal SSH configuration to get to www.example.net, and then you would add the following to the Connection / SSH / Tunnels section,

and clicking Add makes it look like this,

You would then connect to the server using PuTTY.

Once all this has been configured, and you have connected to the remote computer and logged in over SSH normally, any traffic sent to 127.0.0.1:3306 (i.e. port 3306 on your own local computer) is spotted by SSH, tunnelled over to www.example.net and pushed out to 127.0.0.1:3306 from there (i.e. that server’s loopback network connection, onto port 3306 on which we hope, MySQL is listening).

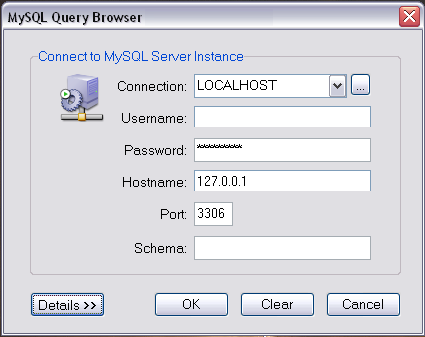
From this point, you treat any application you run that wants to connect as if you were running the MySQL server locally, for example with Query Browser you would start it, and tell it to connect to the localhost on port 3306, and then fill in the credentials of the MySQL service running on your remote server.

This example covers all cases of trying to connect to simple services, running on remote servers where you can SSH to them, but not connect remotely to the service due to either a firewall or local configuration.

Maybe your server runs a POP3 service that you don’t want anyone connecting to remotely and you want to encrypt all your traffic to and from.  Configure the POP3 server to only listen to local connections and then use the following tunnel,

ssh -L 127.0.0.1:110:127.0.0.1:110 fred@www.example.net

Now you can point your local mail client at 127.0.0.1 port 110 to collect mail, and it will be tunnelled to the remote POP3 server in the background.

Random ssh attacks

Somewhere on the internet there’s a machine I have access to, which is running an ssh daemon.  That machine has a public internet address.  Between the 26th of April 2009 at 8:55am and the 19th of July 2009 at 1:37pm there have been 105,043 failed ssh login attempts.  That’s over 84 days (roughly).  So that works out at 1250’ish failed login attempts per day.  Which is about 52 per hour which isn’t a million miles away from 1 failed login attempt every minute on that server (it’s actually 0.86 attempts per minute).

The attempts come in batches, so every few hours there’ll be a few hundred from the same source.  Sometimes they try hundreds of passwords against root and othertimes they’ll try hundreds of different user ID’s.

In those 84 days there have been attacks from around 259 different source IP addresses.  As for usernames attacked, there are 17,532 different ones attempted in that period.

The most popular day was the 2nd July with 7387 attacks in one day, from 8 different sources.  Two specific IP addresses accounted for 3173 and 2826 of those attacks.  One source tried 728 user ID’s in 2826 attempts and the other 1615 different user ID’s in 3173 attempts.

The root user ID has been attacked 27,210 time throughout the whole period.  The most popular non-root user ID to be attacked is admin with 2392 attempts, then test with 1330 attempts and in the next slot is guest at 627 attempts.  Application based ID’s were popular with oracle (623), mysql (399), postgres (311), ftp (251) and teamspeak (165).  Amusingly, the most popular regular names attempted were paul (211) then john (201) and michael (180).

There doesn’t seem to be a preferred hour to attack servers, here’s the breakdown by hour,

  • 01 – 5696
  • 02 – 6249
  • 03 – 7387
  • 04 – 4127
  • 05 – 4388
  • 06 – 3457
  • 07 – 4809
  • 08 – 3920
  • 09 – 3481
  • 10 – 4708
  • 11 – 3894
  • 12 – 3062
  • 13 – 3542
  • 14 – 2805
  • 15 – 4481
  • 16 – 5823
  • 17 – 4198
  • 18 – 2160
  • 19 – 2496
  • 20 – 3949
  • 21 – 7980
  • 22 – 4823
  • 23 – 3418
  • 00 – 4187

I could do some analysis of the source addresses, but I’m not really sure how useful it would be, many of them are likely to be compromised workstations or forged address.