SSH tunnelling is powerful and useful. If you can get your head around networking and ports it’s pretty easy to set up, but it’s one of those things that either sticks or doesn’t, and it’s easier to work out when you’ve got a specific problem to solve by using it. I personally use Cygwin under Windows and so my tunnelling is done using the command line OpenSSH client, however I used to use PuTTY which will do tunnelling as well, and there are plenty of other options. If you’re already on a UNIX-like setup with OpenSSH then the same command line options are valid as for the Cygwin version.
I wanted to run through some simple examples, and then show how the tunnelling is configured to support them and what actually happens. But first, a general statement. SSH tunnelling allows you to make a connection from your local computer, to a service on another computer than your local computer can’t get to directly, via a computer you can get to over SSH. That includes a two machine situation where you want to get to service X on a computer but can’t because of say a firewall, but you can SSH to the very same machine. It also includes a three computer scenario where you hop from a middle computer to a computer it can access but you can’t.
Example 1 – two computers – can’t access service directly
So in this example, we have your local computer (your laptop for example, but this could be any computer you are logged on to), and a remote web server. The web server has MySQL installed but the sensible sysadmin has ensured it’s only listening to local connections so that evil people can’t connect to it and do bad things. You want to use a nice MySQL GUI you’ve got (say MySQL Query Browser) but can’t connect.
We assume for this example that you have a shell account on your web server with the username of fred. What you need to achieve, is to let software running on your workstation access a local port, which SSH then picks up, shoves across to the remote server, and dumps onto the local port at that end (i.e. a tunnel). To keep things easy, we’ll use the same local port on our workstation that MySQL is listening on at the other (3306) end but you don’t have to.
In plan English then, we need to convince SSH to listen for stuff on our workstation arriving on port 3306, tunnel that across to our server, and pass it to the local port 3306 over there, and bring back any traffic in the opposite direction. To achieve that, SSH has to make a connection over it’s own regular port first, and then it sets things up.
The OpenSSH command line to achieve this is,
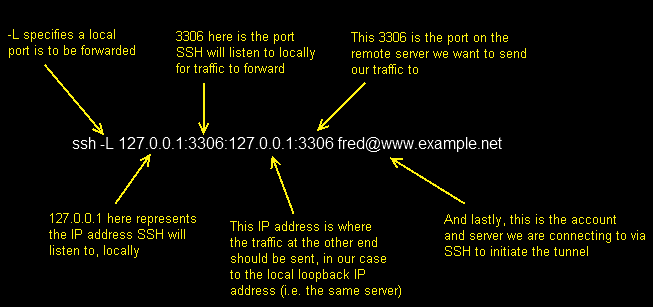
ssh -L 127.0.0.1:3306:127.0.0.1:3306 fred@www.example.net
That’s the long hand version, you might see that written as,
ssh -L 3306:127.0.0.1:3306 fred@www.example.net
or
ssh -L 3306:localhost:3306 fred@www.example.net
They will all work and achieve the same thing, but the long hand version for me, is the easiest to take and apply elsewhere. So reading it, you get the following.
Using PuTTY you would set up a normal SSH configuration to get to www.example.net, and then you would add the following to the Connection / SSH / Tunnels section,
and clicking Add makes it look like this,
You would then connect to the server using PuTTY.
Once all this has been configured, and you have connected to the remote computer and logged in over SSH normally, any traffic sent to 127.0.0.1:3306 (i.e. port 3306 on your own local computer) is spotted by SSH, tunnelled over to www.example.net and pushed out to 127.0.0.1:3306 from there (i.e. that server’s loopback network connection, onto port 3306 on which we hope, MySQL is listening).
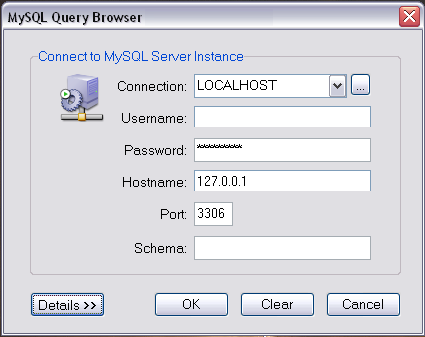
From this point, you treat any application you run that wants to connect as if you were running the MySQL server locally, for example with Query Browser you would start it, and tell it to connect to the localhost on port 3306, and then fill in the credentials of the MySQL service running on your remote server.
This example covers all cases of trying to connect to simple services, running on remote servers where you can SSH to them, but not connect remotely to the service due to either a firewall or local configuration.
Maybe your server runs a POP3 service that you don’t want anyone connecting to remotely and you want to encrypt all your traffic to and from. Configure the POP3 server to only listen to local connections and then use the following tunnel,
ssh -L 127.0.0.1:110:127.0.0.1:110 fred@www.example.net
Now you can point your local mail client at 127.0.0.1 port 110 to collect mail, and it will be tunnelled to the remote POP3 server in the background.


Great article/tutorial! You helped me a lot again! 🙂
Nice greetings from Vienna!