Simple Debian Squeeze LAMP Config

Want the instant gratification solution?  Scroll down to “All In One” below.

Several of the Linux (Debian Squeeze) / Apache2 / MySQL / PHP (LAMP) configs I’ve seen on the ‘net include complexity you just don’t need (like suEXEC or suPHP).  If you’re setting up a basic server (physical, VPS, Xen, OpenVZ, whatever) and you’re going to be the only person running it, then setting up a LAMP environment is trivial.

This post assumes your server boots and you can log in and that it’s a basic Squeeze install with none of the relevant software pre-installed.  I hate sudo, so I’m going to assume you have either su’d to root (su – root) or that you’ve switched to root via sudo (sudo su – root).  If not, you’ll need to prefix all of these commands with sudo (after setting sudo up).

Although this little guide is for Debian, I think it’ll work unchanged on Ubuntu as well.  This guide also assumes that your server hosts a single website, so nothing fancy with any Apache2 VirtualHosts.

All of the follow steps can be combined, but I like to install by stages so that I can test each element on it’s own, and not get overwhelmed.

One of the big mistakes people new to Debian or Ubuntu do, is they think they have to manually edit config files to get things working.  The Debian packagers spend a lot of time making Debian packages work properly with each other with the absolute minimum manual effort.

Install Apache2

While Apache2 might be a bloated-warthog in the eyes of some system administrators, it’s ubiquitous, reliable, feature rich, well documented and well supported.  You can play with lighttpd, nginx and other options later, but this is LAMP, so let’s install the A.

The default Apache2 install on Debian will try and use the Worker MPM for Apache2.  We want the Prefork MPM when we use PHP5 later, so we’ll specify that straight away.

apt-get install apache2 apache2-mpm-prefork

And that’s it.  Assuming that runs successfully (errors are outside the scope of this walkthrough), you should be able to connect to the web server of your server on port 80 (iptables is also outside the scope of this, but a blank Debian install won’t have any firewalling in the way anyway).

If the install worked, connecting should return a page which says “It works!” and some information about this being the default web page.

Install PHP

Again, PHP gets bad press these days and maybe rightly so, but again it’s well used, well supported and well understood.  It’s probably easier to install it along with Apache2 in reality, because Debian does all the post config work at once then, but if you do it later, you are at least in control of the various stages.

We need to install two things, PHP5 and the Apache2 PHP module (on Debian, this package is libapache2-mod-php).

apt-get install php5 libapache2-mod-php5

and then restart Apache2 (I use the following command, any method that reloads the Apache2 config file works)

/etc/init.d/apache2 restart

That’s it.  You don’t need to edit anything, enable anything, configure anything.  Debian handles all that for you.  The default install of Apache2 creates a /var/www directory which it uses as the root for your web site.  If you go to that directory and create a file called test.php, and put this into it,

<?php phpinfo(); ?>

You can then test the PHP5 install has worked by connecting to your web server and requesting the file test.php.  If it asks you to save it, something went wrong (or you didn’t restart Apache2), otherwise you should get a full list of the PHP settings.

NB: Debian installs Suhosin by default.  This should be okay, but it can cause issues with some features of WordPress and phpMyAdmin.

Install MySQL

The MySQL install is the most complex, because you’ll have to create a password!  Otherwise, it’s as simple as the above steps.  As well as MySQL we need to remember to install the PHP5 MySQL module, otherwise we won’t be able to interact with the database.

apt-get install mysql-server php5-mysql

After some packages are downloaded and installed, you’ll be asked to set a password for the MySQL root user.  The dialog says this is not mandatory.  I think it should be.  You should absolutely set this password.  It does not need to match the Linux root user password, and as in all cases, it should actually differ significantly.

Restart Apache2 for good measure, and you’re done.  MySQL will be started, the relevant libraries are installed, and Apache2 / PHP5 / MySQL can all communicate as required.

By default, MySQL won’t be listening on any external interfaces, which is a good thing, so only your website can communicate with it.  Some guides recommend installing phpMyAdmin at this point, and you can if you want, although I prefer not to.

Permissions

In a default Debian install, Apache2 and PHP5 run as the www-data user.  By default, the permissions on /var/www are

drwxr-xr-x root root

That means the web server can’t create any files or directories in /var/www.  That’s a problem when installing things like WordPress which want to create their own config files or .htaccess files.  Because we’re not worried about multiple users on our server, or different customers, it’s safe to set the owner of /var/www to www-data:www-data, and do the same for all files in that directory.  This advice is only true for a server where you don’t mind all the websites running as the same user, but that’s the point of this example anyway!

All In One

The following command will install the whole thing in one go, and all you need to do is set the MySQL password.

apt-get install apache2 apache2-mpm-prefork php5 libapache2-mod-php5 mysql-server php5-mysql

Follow Up Steps

Later on you might want to install additional PHP modules (such as php5-curl, php5-gd, php5-mcrypt), and for sites which you expect to be busy on servers with not much memory you might want to look at using apache2-mpm-worker and FastCGI.

SSH tunnelling made easy (part two)

In part one of this set of posts, I covered using SSH tunnelling to access a service on a server, from a particular machine that can SSH to the target server, but not access the service directly (due to firewalls or sensible security reasons).  In this post, I’ll cover a three computer scenario.

Example 2 – three computers – can’t access third server directly

This situation covers a few different scenarios.  Perhaps you can SSH to a server in a DMZ (i.e. firewalled from all sides), and from there you can SSH to another server, or perhaps access a website on another server, but you can’t get directly to that server from your computer (you always have to use the middle hop).  Maybe you want to interrogate a web management GUI on a network switch which is connected to a network you’re not on, but you can SSH to a machine on the same network.  There are plenty of reasons why you might want to get a a specific service, on Server 2, which you can’t access directly, but you can access from Server 1, which in turn you can SSH to from your local computer.

The process is identical to the steps followed in the first example, with the only significant difference being the details in the SSH command.  So let’s invent a couple of different scenarios.

Scenario 1 – remote MySQL access

In this example, your web server (www.example.net) provides web (port 80) and ssh (port 22) access to the outside world, so you can SSH to it.  In turn you have another server on the same network as your web server (mysql.example.net) which handles your MySQL database.  Because your sysadmin is sensible, mysql.example.net is behind a software firewall which blocks all remote access except for MySQL and SSH access from www.example.net.

So your workstation can’t SSH to mysql.example.net and hence you can’t use the simple example in the previous article.  You can SSH to www.example.net but you can’t run the GUI up on that computer.  So you need a way to tunnel through to the third machine.  I’ll show you the command first, and it will hopefully be obvious what’s going on.

ssh -L 127.0.0.1:3306:mysql.example.net:3306 fred@www.example.net

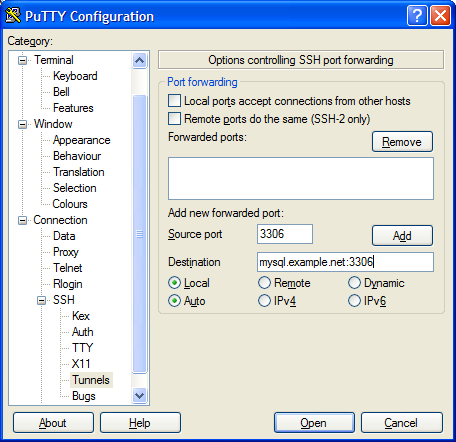
So as before, we open the tunnel by connecting to www.example.net as fred via SSH.  The tunnel we are creating starts on our local machine (127.0.0.1) on port 3306.  But this time, at the other end, traffic ejected from the tunnel is aimed at port 3306 on the machine mysq.example.net.  So rather than routing the traffic back into the machine we’d connected to via SSH, the SSH tunnel connects our local port, with the second server’s port using the middle server as a hop.  There’s nothing naughty going on here.  SSH is simply creating an outbound connection from www.example.net to mysql.example.net port 3306, and pushing into that connection traffic it is collecting from your local machine.

Once the tunnel is in place, you would start up the MySQL GUI exactly the same as previously, filling 127.0.0.1 as the ‘server’, and the correct credentials as held by mysql.example.net.  SSH will pick up the traffic, encrypt it, pass it over port 22 to www.example.net, un-encrypt it, and then pass it to port 3306 on mysql.example.net, and do the same in reverse.

The only difference between this and the example in part one, is the destination for our tunnel.  Rather than telling SSH to talk back to the local address on the server we connect to, we simply tell it which server we want to connect to elsewhere in the network.  It’s no more complex than that.

Here’s the setup for PuTTY.

Scenario 2 – network switch GUI

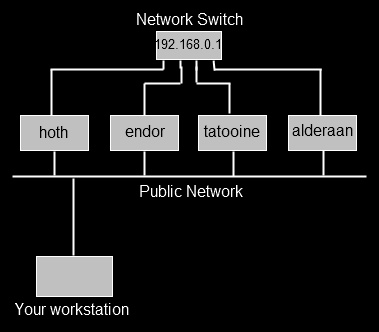
Maybe you support a set of servers which you can SSH to, but which also have their own private network running from a switch that itself isn’t connected to the public network.  One day you need to use the web GUI on the switch (perhaps management have asked for a screenshot and they don’t understand why you sent them an ssh log file first time around) which runs over port 80.

So, we can ssh as user fred to say, the server endor using ssh fred@endor.  We can’t connect to our network switch (192.168.0.1) from our own workstation, but we can from endor.  What we need to do is create a tunnel from our machine, which goes to endor, and then from endor into port 80 on the switch.  This time, we won’t use port 80 on our local machine (maybe we’re already running a local web server on port 80), we’ll use port 8000.  The command therefore is this,

ssh -L 127.0.0.1:8000:192.168.0.1:80 fred@endor

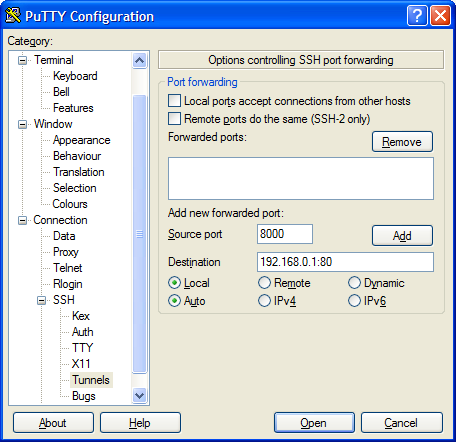
So, make SSH listen locally (127.0.0.1) on port 8000, anything it sees on that port should be sent over port 22 to endor, and from there, to port 80 on 192.168.0.1.  SSH will listen for return traffic and do the reverse operation.

This is how that looks in PuTTY.

Once we’ve connected to endor, and the tunnel is in place, we can start a web browser on our own local machine, and tell it to go to the url,

http://127.0.0.1:8000

At that point, SSH will see the traffic and send it to the network switch, which responds, and the tunnel is in place.

Once again, this process works for all simple network protocols such as POP3, SMTP, etc.

SSH tunnelling made easy (part one)

SSH tunnelling is powerful and useful.  If you can get your head around networking and ports it’s pretty easy to set up, but it’s one of those things that either sticks or doesn’t, and it’s easier to work out when you’ve got a specific problem to solve by using it.  I personally use Cygwin under Windows and so my tunnelling is done using the command line OpenSSH client, however I used to use PuTTY which will do tunnelling as well, and there are plenty of other options.  If you’re already on a UNIX-like setup with OpenSSH then the same command line options are valid as for the Cygwin version.

I wanted to run through some simple examples, and then show how the tunnelling is configured to support them and what actually happens.  But first, a general statement.  SSH tunnelling allows you to make a connection from your local computer, to a service on another computer than your local computer can’t get to directly, via a computer you can get to over SSH.  That includes a two machine situation where you want to get to service X on a computer but can’t because of say a firewall, but you can SSH to the very same machine.  It also includes a three computer scenario where you hop from a middle computer to a computer it can access but you can’t.

Example 1 – two computers – can’t access service directly

So in this example, we have your local computer (your laptop for example, but this could be any computer you are logged on to), and a remote web server.  The web server has MySQL installed but the sensible sysadmin has ensured it’s only listening to local connections so that evil people can’t connect to it and do bad things.  You want to use a nice MySQL GUI you’ve got (say MySQL Query Browser) but can’t connect.

We assume for this example that you have a shell account on your web server with the username of fred.  What you need to achieve, is to let software running on your workstation access a local port, which SSH then picks up, shoves across to the remote server, and dumps onto the local port at that end (i.e. a tunnel).  To keep things easy, we’ll use the same local port on our workstation that MySQL is listening on at the other (3306) end but you don’t have to.

In plan English then, we need to convince SSH to listen for stuff on our workstation arriving on port 3306, tunnel that across to our server, and pass it to the local port 3306 over there, and bring back any traffic in the opposite direction.  To achieve that, SSH has to make a connection over it’s own regular port first, and then it sets things up.

The OpenSSH command line to achieve this is,

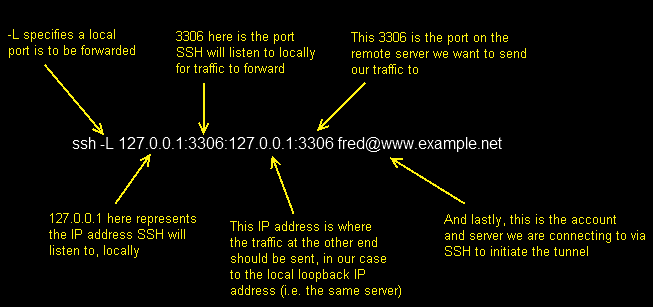
ssh -L 127.0.0.1:3306:127.0.0.1:3306 fred@www.example.net

That’s the long hand version, you might see that written as,

ssh -L 3306:127.0.0.1:3306 fred@www.example.net

or

ssh -L 3306:localhost:3306 fred@www.example.net

They will all work and achieve the same thing, but the long hand version for me, is the easiest to take and apply elsewhere.  So reading it, you get the following.

Using PuTTY you would set up a normal SSH configuration to get to www.example.net, and then you would add the following to the Connection / SSH / Tunnels section,

and clicking Add makes it look like this,

You would then connect to the server using PuTTY.

Once all this has been configured, and you have connected to the remote computer and logged in over SSH normally, any traffic sent to 127.0.0.1:3306 (i.e. port 3306 on your own local computer) is spotted by SSH, tunnelled over to www.example.net and pushed out to 127.0.0.1:3306 from there (i.e. that server’s loopback network connection, onto port 3306 on which we hope, MySQL is listening).

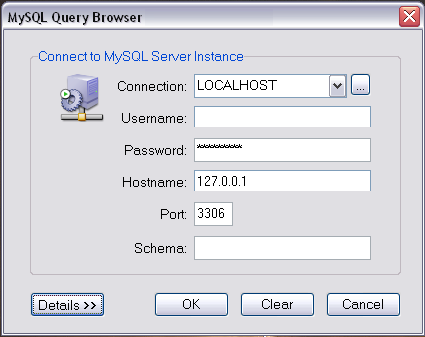
From this point, you treat any application you run that wants to connect as if you were running the MySQL server locally, for example with Query Browser you would start it, and tell it to connect to the localhost on port 3306, and then fill in the credentials of the MySQL service running on your remote server.

This example covers all cases of trying to connect to simple services, running on remote servers where you can SSH to them, but not connect remotely to the service due to either a firewall or local configuration.

Maybe your server runs a POP3 service that you don’t want anyone connecting to remotely and you want to encrypt all your traffic to and from.  Configure the POP3 server to only listen to local connections and then use the following tunnel,

ssh -L 127.0.0.1:110:127.0.0.1:110 fred@www.example.net

Now you can point your local mail client at 127.0.0.1 port 110 to collect mail, and it will be tunnelled to the remote POP3 server in the background.