Apache2 MPM’s

A couple of hours ago I wrote a post about migrating web services to a Debian VM running Squeeze, from one which had been running Lenny.  I said I’d switched to the prefork MPM under Apache2.

Well, if you’re reading this on my site, you’re reading it via the worker MPM once again – only a couple of hours later.  It became obvious pretty quickly once the site had real web pages, and real users, that prefork was not going to cut it.  The VM’s are small, only 256MB of memory and so I can’t run many Apache2 processes.  Although I tested a lot of accesses against PHP based pages using Apache’s AB, I missed doing some testing of both PHP content and the large amount of static content that goes with it (such as style sheets, javascript, images, etc.) at the same time.

Under those conditions, the server needed either so many Apache processes that it filled memory, or it reached the limits I had set and page loads took 20+ seconds.

So, I quickly switched back to the worker MPM and PHP running under Fast CGI, and the page loads are back down to 2 seconds or so on average.

I still have some work to do, to make sure I don’t start too many PHP5 CGI processes, but at least the sites are useable again.

Virtual Machines – taking the pain out of major upgrades

If your computers are physical machines, where each piece of hardware runs a single OS image, then upgrading that OS image puts your services at risk or makes them unavailable for a period of time.

Sure, you have a development and test environment, where you can prove the process, but those machines cost money.  So processes develop to either ensure you have a good backout, or you can make changes you know will work.

Virtual Machines have changed the game.  I have a couple of Linux (Debian) based VM’s.  They’re piddly little things that run some websites and a news server.  They’re basically vanity VM’s, I don’t need them.  I could get away with shared hosting, but I like having servers I can play with.  It keeps my UNIX skills sharp, and let’s me learn new skills.

Debian have just released v6 (Squeeze).  Debian’s release schedule is slow, but very controlled and it leads to hopefully, very stable servers.  Rather than constantly update packages like you might find with other Linux distributions, Debian restricts updates to security patches only, and then every few years a new major release is made.

This is excellent, but it does introduce a lot of change in one go when you move from one release of Debian to the next.  A lot of new features arrive, configuration files change in significant ways and you have to be careful with the upgrade process as a result.

For matrix (the VM that runs my news server), I took the plunge and ran through the upgrade.  It mostly worked fine, although services were out for a couple of hours.  I had to recompile some additional stuff not included in Debian, and had to learn a little bit about new options and features in some applications.  Because the service is down, you’re doing that kind of thing in a reasonably pressured environment.  But in the end, the upgrade was a success.

However, the tidy neat freak inside me knows that spread over that server are config files missing default options, or old copies of config files lying round I need to clean up; legacy stuff that is supported but depreciated sitting around just waiting to bite me in obscure ways later on.

So I decided to take a different approach with yoda (the server that runs most of the websites).  I don’t need any additional hardware to run another server, it’s a VM.  Gandi can provision one in about 8 minutes.  So, I ordered a new clean Debian 6 VM.  I set about installing the packages I needed, and making the config changes to support my web sites.

All told, that took about 4 hours.  That’s still less time than the effort required to do an upgrade.

I structure the data on the web server in such a way that it’s easy to migrate (after lessons learned moving from Gradwell to 1and1 and then finally to Gandi), so I can migrate an entire website from one server to another in about 5 minutes, plus the time it takes for the DNS changes to propagate.

Now I have a nice clean server, running a fresh copy of Debian Squeeze without any of the confusion or trouble that can come from upgrades.  I can migrate services across at my leisure, in a controlled way, and learn anything I need to about new features as I go (for example, I’ve switched away from Apache’s worker MPM and back to the prefork MPM).

Once the migration is done, I can shut down the old VM.  I only pay Gandi for the hours or days that I have the extra VM running.  There’s no risk to the services, if they fail on the new server I can just revert to providing them from the old.

Virtual Machines mean I don’t have to do upgrades in place, but equally I don’t have to have a lot of hardware assets knocking around just to support infrequent upgrades like this.

There are issues of course, one of the reasons I didn’t do this with matrix is that it has a lot of data present, and no trivial way to migrate it.  Additionally, other servers using matrix are likely to have cached IP details beyond the content of DNS, which makes it less easy to move to a new image.  But overall, I think the flexibility of VM’s certainly brings another aspect to major upgrades.

Moaning

I’m going to moan about life, you’ve been warned.

Firstly, I’ve not got much to moan about when compared to some people in the world – but we all live within our own context.  So in the global scheme of things, I’m super lucky.  But that doesn’t stop me being overwhelmed by rubbish stuff.  So, in an attempt at some cathartic release, here we go.

We bought our house about 5 or 6 years ago and haven’t done much to it since, so everything that’s ‘wrong’ with the house is a hangover from previous owners.

Driveway

Our driveway is tarmac.  It’s starting to perish and the rate of failure is increasing.  There’s a long crack from the front to almost the back, and about 2 feet of tarmac is going to slowly fall away.  I suspect when our next door neighbour had a long hedgerow removed to put in a fence, the contractor hasn’t backfilled tightly enough, or the ground has dried out, and so the drive has sunk a little.  Around a water access grate at the front of the drive it’s beginning to crumble, and near the back of the house where the tarmac joins a sheet of concrete patio, it’s sinking into a little hole.

Car

Car is due it’s MOT at the end of March and we know it’s going to fail with various bits.  If they come back and say it’s a few hundred, we’ll pay, if they say it’s a lot more we won’t, but if they come back in the middle ground, it’s always an annoying decision.  Pay and hope we get another year out of it, or don’t pay and just replace it.  Replacing a car isn’t easy for us either, we don’t know anything about them, and when you have no transport, getting around to buy another car is always a depressing experience.  I do not cope well.

Brickwork

A layer of bricks around the bottom of the house is crumbling.  This worries me in a sort of esoteric way, I’m not even sure how terrified I should be.

Electrics

The electrics in the house are a little worrying.  At some point, one of the previous owners did some ‘work’, so there are extensions running all over the place, plugs that appear to hang off other plugs, and various other things that seem clearly wrong to me.  But we’d need to get someone in and review it and then do a lot of work to fix it.  And we never have a single lump of cash to do that with.

Plumbing

The plumbing isn’t bad (especially compared to the electrics), but the bathroom sink hot tap has seized up, and although it’s decreasing in frequency, flushing the loo causes some of the pipes somewhere to vibrate.  Also, the silicon sealant around the bath and sinks has perished and really needs sorting.

Kitchen

The oven is starting to fall apart, and I try and avoid thinking about how the various bits of electrical equipment in the kitchen are actually wired in.

Windows

Our bedroom double glazed window has had a hole in the outside of the glass since we moved in.  The woodwork on all the frames needs serious attention.  One of the previous owners extended the kitchen, and the kitchen window’s outside wooden frame doesn’t actually fit into the brickwork properly.  So last year I found two 1.5cm diameter holes at the end of the woodwork, between the frame and the bricks.  Lovely.

Plaster

The paint on the wall in our bedroom under the window is flaking away.  Either it was put onto the plaster while it was wet, or we’ve got some damp action going on.

Decorating

The whole house is in serious need of internal decoration.


Debian / IPv6 / ip6tables / arno-iptables-firewall

Gandi turned IPv6 on, on my virtual host and I’ve been playing catch up ever since.  I’d not spent much time looking at IPv6 other than a cursory glance and I sort of knew the basics.  But once they’d switched it on I had to put in a little bit of reading time.

Did I want the same hostname to resolve to both the IPv4 and IPv6 address, or did I want to use a different hostname for each?  What was I going to do about firewalls?  And a few other things.

Because the iptables documentation makes my brain bleed, I use an out-of-the-box firewall tool (arno-iptables-firewall) which I’ve found extremely useful.  However, the Debian stable version doesn’t support IPv6 configurations.

That left me with three choices.  Try and work out an ip6tables setup for myself, grab a different firewall product, or backport the latest version of arno-iptables-firewall to Debian Squeeze.  Backporting seemed like the most interesting option – so I did that.

Surprisingly it wasn’t as hard as I expected, although I did have to learn a bunch of Debian Package Management terminology in very short notice.  This post helped a ton.  Up until this point, IPv6 access to the server had been working fine, because there was nothing in the way 😉 A couple of connections with other servers had started using the IPv6 and I wanted to retain those.

I checked the config for the firewall, and restarted it.  Everything seemed okay.  However a few days later, another sysadmin got in touch and told me they could no longer get to the server on it’s IPv6 address.  It turned out I could, but only from another server on the same network, and after a little digging and investigation it became clear the issue was routing.

Turning the firewall on and off didn’t fix it, but it seemed like rebooting got it working, and as soon as I started arno-iptables-firewall the problem came back.  So, I stopped using the firewall for IPv6 and everything was okay.  Until overnight the problem came back on it’s own.

One of the key things about IPv6 is that it relies on ICMPv6 far more than IPv4 did.  One of the most important things, is that ICMP is used to do Neighbor Discovery.

Although the arno-iptables-firewall setup was set to allow ICMP through, I had missed one critical setting.  Gandi uses IPv6 stateless autoconfiguration to provide IPv6 information to the host.  This means the host continues to check how to route traffic.  The missed config stopped this information from arriving at the host, and as a result, the essential route to the outside world expired from the routing table.

If you’re uisng arno-iptables-firewall v2.0.0a, and your server uses stateless autoconfiguration, make sure you set the following two options,

# Only disable this if you're NOT using forwarding (required for NAT etc.) for
# increased security.
# Note: If enabled and IPV6 enabled, local IPv6 autoconf will be disabled.
# -----------------------------------------------------------------------------
IP_FORWARDING=0
# (EXPERT SETTING!) Only disable this if IP_FORWARDING is disabled and
# you do not use autoconf to obtain your IPv6 address.
# Note: This is ignored if IP_FORWARDING is enabled. (IPv6 Only)
# -----------------------------------------------------------------------------
IPV6_AUTO_CONFIGURATION=1

By default, IP_FORWARDING will be set to 1, and that stops the IPV6_AUTO_CONFIGURATION setting from taking effect.  Once I switched IP_FORWARDING to 0, the route came back and everything has been fine since.


Soup!

I’ve blogged a couple of times about the soup I make (I think, although a quick search doesn’t reveal anything).  Anyway, it seems to be good for my blood sugar which I found out after I’d been making it a while, which is handy for my diabetes.  It took me a few years to get it right – my mum makes it (or used to) with a ham shank, which I could never get around to sorting out.

I eventually settled on a gammon joint as the base and it works quite well.  Since I’m about to put another batch on, I thought I’d write down how I make it.

I buy a gammon join, and some potatoes, carrots, swede, shallots, leeks and lentils.  I boil the gammon joint for some period of time, until it’s done.  Then I chop the various amounts of vegetables, and chuck them and the lentils into the stock. I know I should strain the stock and get the fat out, but I don’t.  I then chop some of the gammon joint and stick that in (I slice the rest and keep it).  I then simmer it for some period of time until the lentils have turned completely smooth.

See? Easy 🙂

I guess if you want numbers, just remember that I don’t look at this by quantity, I just buy whatever looks okay at the time and stick it all in.

  • Gammon Joint – today’s is around 1.7kg, un-smoked, good quality
  • 300g sweet shallots – quartered
  • 1kg potatoes (I tend to use British Charlotte potatoes, because they don’t turn to mush) – cut into chunks (halved, or quartered if they’re big)
  • 4-6 leeks – sliced roughly 1-2cm thick
  • 500g swede – cut into chunks
  • 500g carrots – cut into 1-2cm chunks
  • 500g red split lentils.
  • This gives 8-10 servings.

Half cover the gammon (in a big pan), simmer for an hour or so, and then while it’s cooling, chop the veg.  Take the gammon out (remove the fat from the gammon, and get the fat out of the stock if you want – easier if you make the gammon stock the day before, I don’t).  Stick the veg and lentils into the stock.  Chop gammon to taste, stick into the stock.  At this point, you need to judge if there’s enough water or if you need to add more.  I make this soup *thick*.  I’m serious, it’s slice-able when cold.  However, if you like it with more liquid you’ll need an even bigger pan.

Heat slowly, stir often to prevent sticking.  It’s done for me when the lentils are virtually a single homogeneous gloop.

Graphing INN2 stats through Munin

I run a news server (using INN2), and I graph the performance of the server on which it sits using Munin.  I used to use Cacti, but find Munin much, much easier to set up and get going, even if the interface isn’t quite as fancy.

Munin comes with a collection of regular plugins for graphing various linux services and system stats (such as Apache, MySQL, etc.) but it obviously can’t include everything.  I spent about 10 minutes seeing if anyone had written their own plugin for reporting on INN2 traffic stats, but couldn’t see anything.  So I rolled my own.  I tried this under Cacti and frankly, it was painful.  Not so much the script to gather the data, but getting the graphs actually up and running.

With Munin, it’s trivial.  You can read all about it here, which is where I worked out what I needed to do.

Disclaimer: My shell scripting is shockingly lazy, and my use of awk can be compared to someone playing an exquisite 400 year old violin with a hammer.  Sorry, but suck it up.

I use Munin on a Debian system installed, so the paths may vary depending on your setup.  You need to complete three steps.

1. Get your stats

Munin collects data every 300 seconds.  You need a script which can be run every 300 seconds to return data.  The output of your script should be,

datavariable.value actualvalue

where datavariable is the name you give your erm, data variable, value is the word value and actualvalue is the value you want to graph.  If you have several values, you just output them one line at a time,

datavariable.value actualvalue
datavariable_b.value actualvalue
datavariable_c.value actualvalue

Once you have a script which can output that, you’re most of the way there.

2. Describe your graph

What Munin actually graphs is based on what your script outputs when it is passed a command line parameter of config.  There are a bunch of values you should return which describe the graph, and then a bunch of values which describe the variables (i.e. the stuff above returned by your script), their format and how they should be put onto the graph.  Here’s a simple example,

[sourcecode language=”bash” gutter=”false”]
echo ‘graph_title CPU usage’
echo ‘graph_vlabel %’
echo ‘graph_scale no’
echo ‘graph_info This graph shows how CPU time is spent.’
echo ‘system.label system’
echo ‘system.draw AREA’
echo ‘system.min 0’
[/sourcecode]

That would tell Munin to create a graph with the relevant title, to label the vertical axis with a single %, add a little bit of text and graph a single variable called system.  The system variable is labelled on the graph as system, is an AREA plot and has a minimum value of 0.

There’s plenty more you can do, which you can read about on the Munin site, but that’s the basic stuff, and should be returned when your script is called with config on the command line.  (By the way, your script can be anything executable, perl, shell, etc.)

3. Tell Munin to use your script

You should place your script (executable) in /etc/munin/plugins or a link to it.  You should also add various config options to /etc/munin/plugin-conf.d/munin-node which control how your script behaves.  I’m not covering that in detail here but it’s fairly obvious.

You then restart the munin agent, and bingo your stuff turns up.  Like magic.

INN2 Graphs

So, if you want to graph INN2 data, set INN2 to output stats (inn.conf and innfeed.conf) every 300 seconds (or quicker).  Then use the following two scripts, and entries in the munin-node config file (as appropriate for your installation).

inn2_incoming

[sourcecode language=”bash”]
#!/bin/sh
#
# Plugin to monitor inn2 status file, and report incoming traffic
#
# Require read permissions on the appropriate status file, and INN2 to be configured
# to update the file at or quicker than every 5 minutes.
#
#
#
# Parameters:
#
#       config   (required)
#       autoconf (optional – used by munin-config)
#
# Magick markers (optional):
#%# family=auto
#%# capabilities=autoconf
#
# config example for /etc/munin/plugin-conf.d/munin-node
#[inn2_incoming]
#user news
#group news
#env.logfile /var/log/news/inn_status.html
#

LOG=${logfile:-/var/log/news/inn_status}
CATEGORY=${category:-inn2}

if [ "$1" = "autoconf" ]; then
if [ -r "$LOG" ]; then
echo yes
exit 0
else
echo no
exit 1
fi
fi

if [ "$1" = "config" ]; then

echo ‘graph_title INN2 incoming article stats’
echo ‘graph_args –base 1000 -l 0’
echo ‘graph_scale no’
echo ‘graph_vlabel article count’
echo ‘graph_category’ $CATEGORY
echo ‘graph_period minute’

echo ‘offered.label Total articles offered’
echo ‘offered.type DERIVE’
echo ‘offered.min 0’
echo ‘accepted.label Articles accepted’
echo ‘accepted.type DERIVE’
echo ‘accepted.min 0’
echo ‘refused.label Articles refused’
echo ‘refused.type DERIVE’
echo ‘refused.min 0’
echo ‘rejected.label Articles rejected’
echo ‘rejected.type DERIVE’
echo ‘rejected.min 0’
echo ‘dupe.label Duplicate articles’
echo ‘dupe.type DERIVE’
echo ‘dupe.min 0’

exit 0
fi

awk -v RS="" ‘/global/ {print $0}’ < $LOG | awk -v RS="" -F":" ‘{printf "offered.value %d\naccepted.value %d\nrefused.value %d\nrejected.value %d\ndupe.value %d\n",$5,$7,$10,$13,$16}’
[/sourcecode]

inn2_outgoing

[sourcecode language=”bash”]
#!/bin/sh
#
# Plugin to monitor inn2 status file, and report outgoing traffic
#
# Require read permissions on the appropriate status file, and INN2 to be configured
# to update the file at or quicker than every 5 minutes.
#
#
#
# Parameters:
#
# config (required)
# autoconf (optional – used by munin-config)
#
# Magick markers (optional):
#%# family=auto
#%# capabilities=autoconf
#
# config example for /etc/munin/plugin-conf.d/munin-node
#[inn2_incoming]
#user news
#group news
#env.logfile /var/log/news/innfeed.status
#

LOG=${logfile:-/var/log/news/innfeed.status}
CATEGORY=${category:-inn2}

if [ "$1" = "autoconf" ]; then
if [ -r "$LOG" ]; then
echo yes
exit 0
else
echo no
exit 1
fi
fi

if [ "$1" = "config" ]; then

echo ‘graph_title INN2 outgoing article stats’
echo ‘graph_args –base 1000 -l 0’
echo ‘graph_scale no’
echo ‘graph_vlabel article count’
echo ‘graph_category’ $CATEGORY
echo ‘graph_period minute’

echo ‘offered.label Total articles offered’
echo ‘offered.type DERIVE’
echo ‘offered.min 0’
echo ‘accepted.label Articles accepted’
echo ‘accepted.type DERIVE’
echo ‘accepted.min 0’
echo ‘refused.label Articles refused’
echo ‘refused.type DERIVE’
echo ‘refused.min 0’
echo ‘rejected.label Articles rejected’
echo ‘rejected.type DERIVE’
echo ‘rejected.min 0’
echo ‘missing.label Missing articles’
echo ‘missing.type DERIVE’
echo ‘missing.min 0’
echo ‘deferred.label Deferred articles’
echo ‘deferred.type DERIVE’
echo ‘deferred.min 0’

exit 0
fi

awk -v RS="" ‘/global \(process\)/ {print $0}’ < $LOG | awk -v RS="" -F":" ‘{printf "offered.value %d\naccepted.value %d\nrefused.value %d\nrejected.value %d\nmissing.value %d\ndeferred.value %d\n",$5,$7,$9,$11,$13,$15}’
[/sourcecode]

Obviously, depending on your version of INN2, you may have to tweak the awk entry to get the right values.

Lastly, put the following lines into /etc/munin/plugin-conf.d/munin-node

[sourcecode language=”plain” gutter=”false”]
[inn2_incoming]
user news
group news
env.logfile /var/log/news/inn_status.html

[inn2_outgoing]
user news
group news
env.logfile /var/log/news/innfeed.status
[/sourcecode]

And again, those values will need to change to match your distribution / INN2 setup.  Hope this helps someone.

SSH tunnelling made easy (part three)

In the previous two parts of this series, I covered simple tunnels to access services you couldn’t reach, and tunnels which let you hop from one server to another on an otherwise unreachable network.  In this article I’ll cover a powerful feature of SSH, the ability to provide port forwarding via the SOCKS mechanism.

SOCKS is a standard method to allow clients to connect to services via a proxy server.  SSH can turn any computer you can connect to (over SSH) into a proxy server for you, and you alone (so it’s secure).

Example 3 – using SOCKS proxy to access multiple services on a network via a secure server

There are several different reasons why you may need to employ SSH to deliver a SOCKS proxy.  Two common reasons are if you’re connected to a public network you don’t trust (like a cafe Wi-Fi network), or if you want to get to a range of services inside a secured network to which you only have SSH access.

Since the process is identical in both cases, I won’t cover them separately.

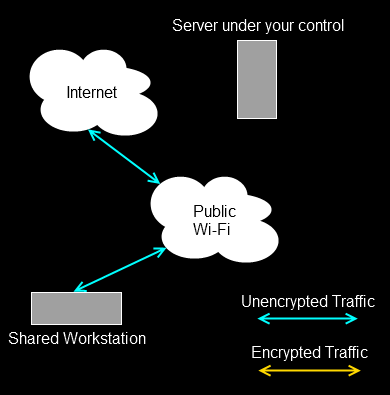
The diagram below shows a shared workstation (maybe in a library) connected to a public Wi-Fi network.  You can’t trust the network, anyone could be intercepting unencrypted traffic on it.

There is however a sever somewhere to which you have SSH access (and which in theory, you control and so trust).  What you would like to do is browse several websites or connect to some other SOCKS supporting services, without anyone on the public Wi-Fi being able to intercept that traffic.  If you were only connecting to a single service you could use simple tunnelling as per the previous two examples, but this time, you want to browse a few websites, and it’s not sensible to try and create a tunnel for each one.  In this instance, you use SSH to set up a dynamic tunnel, which provides a SOCKS proxy.

The command is even easier.

ssh -D 127.0.0.1:9090 fred@shell.example.net

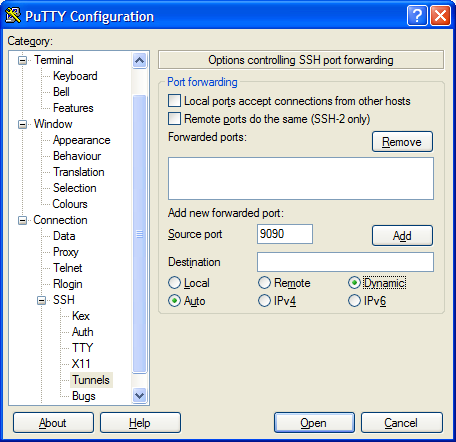
Similar to the previous commands, but you’ll notice there is no target destination, only a listening address and port.  The -D tells SSH to listen on 127.0.0.1 port 9090 in this case, and operate as a SOCKS proxy, starting at the server you’ve connected to.

In PuTTY you would configure this as below,

Note that the destination address is left blank.

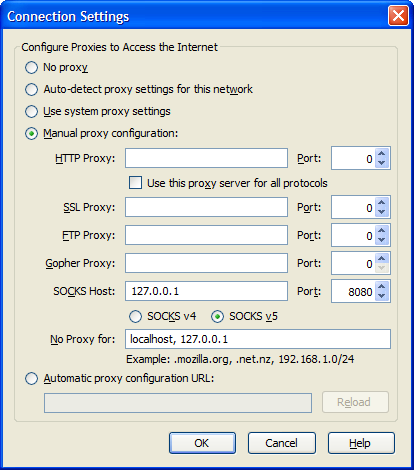
In order to use this tunnel, you need to do a little more work than previously.  Assuming we’re going to use it primarily for web browsing, you would need to tell your web client to use a SOCKS proxy.  In Firefox, you would configure it like this,

Now, when you try and browse anything in Firefox, it sends the requests to what it believes is a SOCKS proxy server (127.0.0.1, port 9090).  That’s really your SSH connection to shell.example.net.  At the other end, your SSH connection sends the data on to the correct web server, receives it, and passes it back to your workstation and into Firefox.

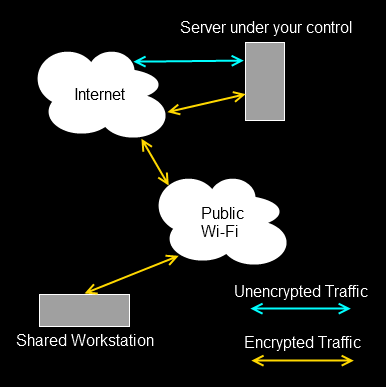
The net result (pun intended) results in a diagram which looks like this.

So your browsing is secure as far as the Public Wi-Fi is concerned.  SOCKS supports a number of different protocols, and different clients are configured in different ways.  But as long as your tool supports SOCKS, you can point it at the 127.0.0.1 9090 server, and it will work as above.

SOCKS via SSH is extremely powerful.  Here’s a further diagram of another situation where you may want to use it.

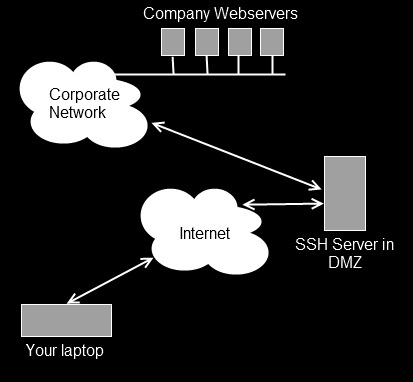
Your company has a number of web servers internally which provide time recording, project planning and other information.  While working away from the office you need to access those services.  There are too many to set up individual tunnels.  There is an SSH server in the company’s control which can be reached from the Internet.  Using the -D option, you can turn that server into your own SOCKS proxy and browse to the company web servers to complete your work.

While not intended as a replacement for a VPN (mainly because it only really supports a subset of network protocols), this SOCKS implementation is very useful.

SSH tunnelling made easy (part two)

In part one of this set of posts, I covered using SSH tunnelling to access a service on a server, from a particular machine that can SSH to the target server, but not access the service directly (due to firewalls or sensible security reasons).  In this post, I’ll cover a three computer scenario.

Example 2 – three computers – can’t access third server directly

This situation covers a few different scenarios.  Perhaps you can SSH to a server in a DMZ (i.e. firewalled from all sides), and from there you can SSH to another server, or perhaps access a website on another server, but you can’t get directly to that server from your computer (you always have to use the middle hop).  Maybe you want to interrogate a web management GUI on a network switch which is connected to a network you’re not on, but you can SSH to a machine on the same network.  There are plenty of reasons why you might want to get a a specific service, on Server 2, which you can’t access directly, but you can access from Server 1, which in turn you can SSH to from your local computer.

The process is identical to the steps followed in the first example, with the only significant difference being the details in the SSH command.  So let’s invent a couple of different scenarios.

Scenario 1 – remote MySQL access

In this example, your web server (www.example.net) provides web (port 80) and ssh (port 22) access to the outside world, so you can SSH to it.  In turn you have another server on the same network as your web server (mysql.example.net) which handles your MySQL database.  Because your sysadmin is sensible, mysql.example.net is behind a software firewall which blocks all remote access except for MySQL and SSH access from www.example.net.

So your workstation can’t SSH to mysql.example.net and hence you can’t use the simple example in the previous article.  You can SSH to www.example.net but you can’t run the GUI up on that computer.  So you need a way to tunnel through to the third machine.  I’ll show you the command first, and it will hopefully be obvious what’s going on.

ssh -L 127.0.0.1:3306:mysql.example.net:3306 fred@www.example.net

So as before, we open the tunnel by connecting to www.example.net as fred via SSH.  The tunnel we are creating starts on our local machine (127.0.0.1) on port 3306.  But this time, at the other end, traffic ejected from the tunnel is aimed at port 3306 on the machine mysq.example.net.  So rather than routing the traffic back into the machine we’d connected to via SSH, the SSH tunnel connects our local port, with the second server’s port using the middle server as a hop.  There’s nothing naughty going on here.  SSH is simply creating an outbound connection from www.example.net to mysql.example.net port 3306, and pushing into that connection traffic it is collecting from your local machine.

Once the tunnel is in place, you would start up the MySQL GUI exactly the same as previously, filling 127.0.0.1 as the ‘server’, and the correct credentials as held by mysql.example.net.  SSH will pick up the traffic, encrypt it, pass it over port 22 to www.example.net, un-encrypt it, and then pass it to port 3306 on mysql.example.net, and do the same in reverse.

The only difference between this and the example in part one, is the destination for our tunnel.  Rather than telling SSH to talk back to the local address on the server we connect to, we simply tell it which server we want to connect to elsewhere in the network.  It’s no more complex than that.

Here’s the setup for PuTTY.

Scenario 2 – network switch GUI

Maybe you support a set of servers which you can SSH to, but which also have their own private network running from a switch that itself isn’t connected to the public network.  One day you need to use the web GUI on the switch (perhaps management have asked for a screenshot and they don’t understand why you sent them an ssh log file first time around) which runs over port 80.

So, we can ssh as user fred to say, the server endor using ssh fred@endor.  We can’t connect to our network switch (192.168.0.1) from our own workstation, but we can from endor.  What we need to do is create a tunnel from our machine, which goes to endor, and then from endor into port 80 on the switch.  This time, we won’t use port 80 on our local machine (maybe we’re already running a local web server on port 80), we’ll use port 8000.  The command therefore is this,

ssh -L 127.0.0.1:8000:192.168.0.1:80 fred@endor

So, make SSH listen locally (127.0.0.1) on port 8000, anything it sees on that port should be sent over port 22 to endor, and from there, to port 80 on 192.168.0.1.  SSH will listen for return traffic and do the reverse operation.

This is how that looks in PuTTY.

Once we’ve connected to endor, and the tunnel is in place, we can start a web browser on our own local machine, and tell it to go to the url,

http://127.0.0.1:8000

At that point, SSH will see the traffic and send it to the network switch, which responds, and the tunnel is in place.

Once again, this process works for all simple network protocols such as POP3, SMTP, etc.

SSH tunnelling made easy (part one)

SSH tunnelling is powerful and useful.  If you can get your head around networking and ports it’s pretty easy to set up, but it’s one of those things that either sticks or doesn’t, and it’s easier to work out when you’ve got a specific problem to solve by using it.  I personally use Cygwin under Windows and so my tunnelling is done using the command line OpenSSH client, however I used to use PuTTY which will do tunnelling as well, and there are plenty of other options.  If you’re already on a UNIX-like setup with OpenSSH then the same command line options are valid as for the Cygwin version.

I wanted to run through some simple examples, and then show how the tunnelling is configured to support them and what actually happens.  But first, a general statement.  SSH tunnelling allows you to make a connection from your local computer, to a service on another computer than your local computer can’t get to directly, via a computer you can get to over SSH.  That includes a two machine situation where you want to get to service X on a computer but can’t because of say a firewall, but you can SSH to the very same machine.  It also includes a three computer scenario where you hop from a middle computer to a computer it can access but you can’t.

Example 1 – two computers – can’t access service directly

So in this example, we have your local computer (your laptop for example, but this could be any computer you are logged on to), and a remote web server.  The web server has MySQL installed but the sensible sysadmin has ensured it’s only listening to local connections so that evil people can’t connect to it and do bad things.  You want to use a nice MySQL GUI you’ve got (say MySQL Query Browser) but can’t connect.

We assume for this example that you have a shell account on your web server with the username of fred.  What you need to achieve, is to let software running on your workstation access a local port, which SSH then picks up, shoves across to the remote server, and dumps onto the local port at that end (i.e. a tunnel).  To keep things easy, we’ll use the same local port on our workstation that MySQL is listening on at the other (3306) end but you don’t have to.

In plan English then, we need to convince SSH to listen for stuff on our workstation arriving on port 3306, tunnel that across to our server, and pass it to the local port 3306 over there, and bring back any traffic in the opposite direction.  To achieve that, SSH has to make a connection over it’s own regular port first, and then it sets things up.

The OpenSSH command line to achieve this is,

ssh -L 127.0.0.1:3306:127.0.0.1:3306 fred@www.example.net

That’s the long hand version, you might see that written as,

ssh -L 3306:127.0.0.1:3306 fred@www.example.net

or

ssh -L 3306:localhost:3306 fred@www.example.net

They will all work and achieve the same thing, but the long hand version for me, is the easiest to take and apply elsewhere.  So reading it, you get the following.

Using PuTTY you would set up a normal SSH configuration to get to www.example.net, and then you would add the following to the Connection / SSH / Tunnels section,

and clicking Add makes it look like this,

You would then connect to the server using PuTTY.

Once all this has been configured, and you have connected to the remote computer and logged in over SSH normally, any traffic sent to 127.0.0.1:3306 (i.e. port 3306 on your own local computer) is spotted by SSH, tunnelled over to www.example.net and pushed out to 127.0.0.1:3306 from there (i.e. that server’s loopback network connection, onto port 3306 on which we hope, MySQL is listening).

From this point, you treat any application you run that wants to connect as if you were running the MySQL server locally, for example with Query Browser you would start it, and tell it to connect to the localhost on port 3306, and then fill in the credentials of the MySQL service running on your remote server.

This example covers all cases of trying to connect to simple services, running on remote servers where you can SSH to them, but not connect remotely to the service due to either a firewall or local configuration.

Maybe your server runs a POP3 service that you don’t want anyone connecting to remotely and you want to encrypt all your traffic to and from.  Configure the POP3 server to only listen to local connections and then use the following tunnel,

ssh -L 127.0.0.1:110:127.0.0.1:110 fred@www.example.net

Now you can point your local mail client at 127.0.0.1 port 110 to collect mail, and it will be tunnelled to the remote POP3 server in the background.

Moria – Epic Quest line

Turbine launched the Moria expansion to Lord of the Rings online in November 2008.  Last night, I finally finished the epic quest line (Volume 2), along with some friends.  We put in a lot of effort to finish that quest line, and even with a few extra levels from the Mirkwood expansion some of the group quests were challenging.

It feels good to finally get it complete.  We’re almost up-to-date with all the epic quests, despite the new stuff added with Enedwaith.  That’ll be an interesting situation if we finally catch up – it’ll be the first time since the game went live that any of us are ahead of the game in terms of all the epic content.