I’ve been playing Vector TD on and off for ages. Up until this morning, it’s always been a pretty significant challenge. Although I’ve been able to beat the easy maps it’s never consistent, and even the normal maps have been tough for me, often ending with me losing around wave 44+.
I’m sure many people reading this are thinking ‘you dick, it’s easy’, but at least two folk on Twitter commented they don’t find it that easy and one person asked me to describe my new found strategy, that this morning allowed me to beat both easy levels and two normal levels without losing a single life, and the third normal level losing only one life. So, this post is for them.
There’s not much to the strategy, and this isn’t a step-by-step guide (although the first few steps are common), it’s a number of basic rules that I followed this morning.
Basic rules
- Unless you have absolutely no choice, do not upgrade any towers, or buy any towers in between waves. Always upgrade/buy towers after starting the wave, this gives you the best interest earned on your cash.
- Always take increased interest from the bonus waves. By wave 44 you should be getting 27% interest on your cash. You can use the wave 45 bonus to buy a damage or range increaser if that suits, because by then, cash won’t be an issue.
- Place as few towers as necessary, don’t place them pre-emptively if you can at all help it.
- The aim is to maximise cash, so that after each wave, you end up with either more cash than you started the wave with, or at least nearly the same amount. This means you get constant ‘free’ upgrades and towers.
- You can beat all 5 levels with four tower types. One maxed Green Laser 1, one maxed Red Refractor, one maxed Blue Rays 1, a whole bunch of level 1 Blue Rays 1 and as many high level Red Rockets as you can afford.
- Only the Fast Yellow creeps should be an issue at any stage.
Specific approach
- Your first tower should be a Red Refractor. This uses $200 of your starting $275. On it’s own, and placed correctly, this single tower can defeat the first 3 waves without any upgrades.
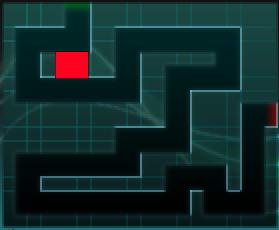
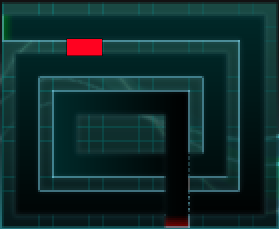
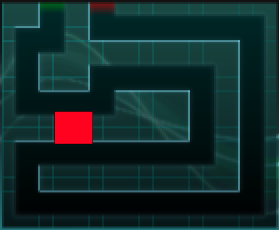
- You should place the tower in a position on each map so that it gets two goes at all the creeps on each wave. I pick specific spots, and you might prefer other ones, but the key is to ensure the creeps have to move quite a way to get back in range, to give the tower time to focus on both lines of creeps. You can see below where I place my starting 3 towers on each map.
- Do nothing for the first three waves. Let that one tower defeat them all, don’t upgrade, don’t spend any money. If that single tower doesn’t work, you need to find another spot on the map.
- The fourth wave is a green wave. The red tower will struggle, but at this point, you’ve got quite a bit of cash saved up. I place a green tower (boring names, compared to red), next to the red tower, and maybe boost it to level 2. This should easily defeat wave 4.
- I then place a blue tower right next to the red and green ones we’ve got so far for waves 5 onward.
- Over the next few waves, during the waves only, upgrade those towers only if your creeps almost get past them on the second pass. By that I mean, your towers should destroy more than half the creeps as they go by the first time, as they round the corner and come back, your three towers should easily wipe them out. If it was close, or you don’t clear half as they go by first time, upgrade the towers a little bit. Preserving cash should be your main focus.
- I tend to get the green tower to level 10 quickly because it’s cheap, and because the Red Refractor struggles on the green waves.
- You should easily and quickly get to $3000 or $4000 in the bank, with just those three towers by the time they are all level 10. You might need an emergency tower for the swift yellow creeps further along, don’t invest too heavily and don’t worry about placing lots of cheap towers anywhere at this stage.
- The entire rest of the game is now about adding Red Rockets and Blue Rays, without spending too much money. I usually buy the first Red Rocket when I have around $6k in the bank.
- Each Red Rocket should be configured to target weak creeps first and to have target locking disabled. This ensures you get rid of as many creeps in each wave as possible. If you end up with one strong creep surviving, so be it, but it’s frustrating to watch them spend ages trying to kill one strong creep while 15 weak ones get through.
- Each Red Rocket should be placed to give good coverage, don’t put them all in one place, but do try and ensure they all overlap as well. Don’t put them anywhere that will mean more than 40% of their coverage is walls.
- You should place Blue Rays all around the entire track, one every 3 or 4 squares. You don’t need to increase them beyond level 1 at all. When you have $15000 in the bank at the end of every wave, and you’re earning 20% interest, you can add 10 level 1 Blue Rays without decreasing your bank balance, so you can quickly swamp the map and turn the whole thing into treacle.
- Spend each wave slowly adding Red Rockets, levelling them all together up to around level 6 or 7 and adding Blue Rays. Do this while keeping your bank balance always over $10k if possible.
- Once you defeat wave 45, you can blow the rest of the cash on increasing the Red Rockets to level 10 and sit back and wait for victory.
- I usually end up with between 7 and 8 Red Rocket towers, each between level 7 and 10 by the last few waves.
Maps
These are where I place my 3 tower startup for each map. Only the second easy map doesn’t have any single good spot, and it can get a bit ‘exciting’ on the 3rd wave and the first yellow wave.
Good luck, I hope it helps.
I can’t yet beat any of the three hard maps, mainly because the choke points don’t work well enough and you need to have more than three towers on the go very quickly.


