Debian and KVM

I thought I’d spend a bit of time getting to know KVM on Debian.  How hard could it be, I thought?  I might fill a few hours, pass the time.

How wrong could I be!

It passed about 7 minutes.

apt-get install qemu-kvm libvirt-bin virtinst virt-manager virt-viewer

I bounced the box at this point, which may or may not have been necessary, then started up virt-manager, configured the VM, pointed it to the Debian net installation ISO, and off it went.

I was almost disappointed by the simplicity.  Guess I’ll have to find something else to play with.

Raspberry Pi sensors – Munin graphing plugin

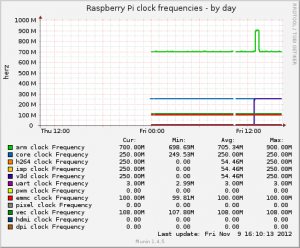
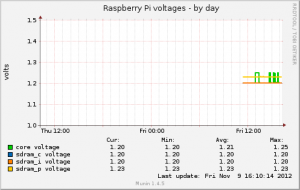
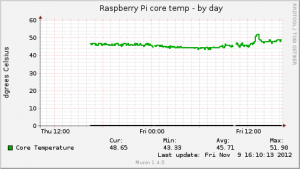
I love Munin!  I’ve finally got one of the Raspberry Pi’s to be reasonably stable, so I’ve set up a munin-node on it.  The standard Linux sensord stuff doesn’t run on the arm core, so I had assumed I wouldn’t be able to see any exciting temperature graphs, but I was wrong!

The Raspberry Pi Debian image includes a command called vcgencmd, which allows root to interrogate various settings and measurements.  That includes the temperature, clock frequencies and voltages across various components.

So I’ve knocked up a quick plugin for Munin which gathers that stuff and graphs it.  You can get it over at GitHub here.  The current code looks like this (but the GitHub copy will be most up-to-date),

[sourcecode language=”bash”]
#!/bin/bash
# -*- sh -*-

: << =cut

=head1 NAME

pisense_ – Wildcard-plugin to monitor Raspberry Pi sensors (temp, volts, clock speed)

=head1 CONFIGURATION

This plugin needs to be run as root for vcgencmd to work.

[pisense_*]
user root

=head2 ENVIRONMENT VARIABLES

This plugin does not use environment variables.

=head2 WILDCARD PLUGIN

This is a wildcard plugin. To specify if you want temperature,
clock speed or volts, link this file to _volt, _temp
or _clock.

For example,

ln -s /usr/share/munin/plugins/pisense_ \
/etc/munin/plugins/pisense_clock

will monitor the clock speeds of your pi.

=head1 BUGS

None known.

=head1 NOTES

This plugin is shamelessley based on the ip_ plugin (structure).

=head1 MAGIC MARKERS

#%# family=auto
#%# capabilities=autoconf suggest

=head1 AUTHOR

Tony (tony@darkstorm.co.uk).

=head1 LICENSE

It’s yours, do with it what you like.

=cut

. $MUNIN_LIBDIR/plugins/plugin.sh

sensor=${0##*/pisense_}

if [[ "$1" == "autoconf" ]]; then
if ! /opt/vc/bin/vcgencmd firmware >/dev/null 2>/dev/null; then
echo "no (could not run /opt/vc/bin/vcgencmd as user $(whoami))"
exit 0
else
echo yes
exit 0
fi
fi

# this is flawed, vcgencmd always returns with RC 0. Needs expanding.
if [[ "$1" == "suggest" ]]; then
if /opt/vc/bin/vcgencmd measure_temp >/dev/null 2>/dev/null; then
echo temp
fi
if /opt/vc/bin/vcgencmd measure_volts >/dev/null 2>/dev/null; then
echo volt
fi
if /opt/vc/bin/vcgencmd measure_clock core >/dev/null 2>/dev/null; then
echo clock
fi
exit 0
fi

if [[ "$1" == "config" ]]; then

if [[ "$sensor" == "temp" ]]
then
echo "graph_title Raspberry Pi core temp"
echo "graph_args –base 1000"
echo "graph_vlabel dgrees Celsius"
echo "graph_category sensors"
echo "temp.label Core Temperature"
echo "temp.min 0"
fi
if [[ "$sensor" == "clock" ]]
then
echo "graph_title Raspberry Pi clock frequencies"
echo "graph_args –base 1000"
echo "graph_vlabel herz"
echo "graph_category sensors"
for clock in arm core h264 isp v3d uart pwm emmc pixel vec hdmi dpi
do
echo "clock$clock.label $clock clock Frequency"
echo "clock$clock.min 0"
echo "clock$clock.type GAUGE"
done
fi
if [[ "$sensor" == "volt" ]]
then
echo "graph_title Raspberry Pi voltages"
echo "graph_args –base 1000"
echo "graph_vlabel volts"
echo "graph_category sensors"
for volt in core sdram_c sdram_i sdram_p
do
echo "volt$volt.label $volt voltage"
echo "volt$volt.min 0"
echo "volt$volt.type GAUGE"
done
fi

exit 0
fi;

if [[ "$sensor" == "temp" ]]
then
temp=$(/opt/vc/bin/vcgencmd measure_temp | awk -F"=" ‘{print $2}’ | awk -F"’" ‘{print $1}’)
echo "temp.value $temp"
fi
if [[ "$sensor" == "clock" ]]
then
for clock in arm core h264 isp v3d uart pwm emmc pixel vec hdmi dpi
do
clockval=$(/opt/vc/bin/vcgencmd measure_clock $clock | awk -F"=" ‘{print $2}’)
echo "clock$clock.value $clockval"
done
fi
if [[ "$sensor" == "volt" ]]
then
for volt in core sdram_c sdram_i sdram_p
do
voltage=$(/opt/vc/bin/vcgencmd measure_volts $volt | awk -F"=" ‘{print $2}’ | tr -d "V")
echo "volt$volt.value $voltage"
done
fi
[/sourcecode]

I’ll post some sample screenshots in a bit!

Debian squeeze gdm / Xserver won’t start without a monitor

The little Atom based computer I was using as a Linux server in the house died.  Well technically, the fan died, which led to the rest of it dying.  It’s a proprietary case and motherboard,  so the fan isn’t something I can just pick up and replace (looks like a laptop fan, squeezed into the case), and I need something working faster than I could repair it.  I had a spare PC upstairs, which isn’t as quiet or as energy efficient as the Atom, but at least it works!  (This was after several days of Raspberry Pi’s failing and trashing SDHC cards, so I was already pretty pissed off with hardware, Linux and the whole building it yourself thing).

Anyway, as it happens, Debian reminded me how exceedingly trivial it is to build a server, and since I had full backups of the Atom PC it didn’t take long to get everything back up and running.  I was also reminded how slow the Atom chips can be, the P4 I’ve replaced it with is a world apart in terms of speed for whatever reason.

The Atom machine was running Ubuntu, but it used to frustrate me when it was quite the same as Debian, and I wanted to go back to a basic Debian build.  Also, since the P4 is more stock than the Atom I don’t need the bleeding edge drivers you get with Ubuntu.  All of this did leave me with one issue though.

When connected to a monitor, the Debian build works fine.  It works if you boot it with a monitor and then remove the monitor as well, but if you boot it without a monitor, it won’t start the X Server.  It tries about a million times [1] and then gives up.

I use Gnome under Debian, and because this machine is sitting physically in my house, I enable the autologon, and remote desktop control, so if I want, I can VNC in from my main machine.  I don’t usually need to do it, and I’m comfortable doing everything I want on that box from the command line, but every now and then it’s nice to use one or two GUI based apps.  Since Gnome supports this out of the box, I don’t feel the need to install VNC and start changing the config – it worked under Ubuntu, and it works under Debian if the monitor is there, I just needed it to work without the monitor.

I did a lot of reading around, there are plenty of suggestions about using VNC instead, some suggestions of modifying xorg.conf with some default display settings, and some other stuff.  I tried setting up an xorg.conf (new versions of X don’t use one by default, so you have to create one), but that didn’t seem to help.  More reading, and more playing around, and then I finally found the exact solution.

You can read the original page here.

Essentially, you need to add an entry to xorg.conf as I had been, but even then, X will probably refuse to start, because it detects modesetting drivers in the kernel and refuses to load the VESA driver.  Here’s the specific section from the error log if you get this,

(II) VESA: driver for VESA chipsets: vesa
(EE) VESA: Kernel modesetting driver in use, refusing to load
(WW) Falling back to old probe method for vesa
(EE) No devices detected.

So, as you can see from the document linked above, you need to disable the modesetting and then X will happily start.  This is the /etc/X11/xorg.conf config file I used (same as the original document),

Section "Device"
Identifier "VNC Device"
Driver "vesa"
EndSection

Section "Screen"
Identifier "VNC Screen"
Device "VNC Device"
Monitor "VNC Monitor"
SubSection "Display"
Modes "1280x1024"
EndSubSection
EndSection

Section "Monitor"
Identifier "VNC Monitor"
HorizSync 30-70
VertRefresh 50-75
EndSection

I also used both the i915 modeset change (because I had an i915 config file already), and the Nvidia one, since the machine has an Nvidia card in it.  A quick reboot, gdm and the X Server both started fine.  Very happy!

So the key isn’t just the xorg.conf above, which most people have posted about, you probably have to disable modesetting in the relevant graphics driver as well.

[1] okay, about half a million.

Simple Debian Squeeze LAMP Config

Want the instant gratification solution?  Scroll down to “All In One” below.

Several of the Linux (Debian Squeeze) / Apache2 / MySQL / PHP (LAMP) configs I’ve seen on the ‘net include complexity you just don’t need (like suEXEC or suPHP).  If you’re setting up a basic server (physical, VPS, Xen, OpenVZ, whatever) and you’re going to be the only person running it, then setting up a LAMP environment is trivial.

This post assumes your server boots and you can log in and that it’s a basic Squeeze install with none of the relevant software pre-installed.  I hate sudo, so I’m going to assume you have either su’d to root (su – root) or that you’ve switched to root via sudo (sudo su – root).  If not, you’ll need to prefix all of these commands with sudo (after setting sudo up).

Although this little guide is for Debian, I think it’ll work unchanged on Ubuntu as well.  This guide also assumes that your server hosts a single website, so nothing fancy with any Apache2 VirtualHosts.

All of the follow steps can be combined, but I like to install by stages so that I can test each element on it’s own, and not get overwhelmed.

One of the big mistakes people new to Debian or Ubuntu do, is they think they have to manually edit config files to get things working.  The Debian packagers spend a lot of time making Debian packages work properly with each other with the absolute minimum manual effort.

Install Apache2

While Apache2 might be a bloated-warthog in the eyes of some system administrators, it’s ubiquitous, reliable, feature rich, well documented and well supported.  You can play with lighttpd, nginx and other options later, but this is LAMP, so let’s install the A.

The default Apache2 install on Debian will try and use the Worker MPM for Apache2.  We want the Prefork MPM when we use PHP5 later, so we’ll specify that straight away.

apt-get install apache2 apache2-mpm-prefork

And that’s it.  Assuming that runs successfully (errors are outside the scope of this walkthrough), you should be able to connect to the web server of your server on port 80 (iptables is also outside the scope of this, but a blank Debian install won’t have any firewalling in the way anyway).

If the install worked, connecting should return a page which says “It works!” and some information about this being the default web page.

Install PHP

Again, PHP gets bad press these days and maybe rightly so, but again it’s well used, well supported and well understood.  It’s probably easier to install it along with Apache2 in reality, because Debian does all the post config work at once then, but if you do it later, you are at least in control of the various stages.

We need to install two things, PHP5 and the Apache2 PHP module (on Debian, this package is libapache2-mod-php).

apt-get install php5 libapache2-mod-php5

and then restart Apache2 (I use the following command, any method that reloads the Apache2 config file works)

/etc/init.d/apache2 restart

That’s it.  You don’t need to edit anything, enable anything, configure anything.  Debian handles all that for you.  The default install of Apache2 creates a /var/www directory which it uses as the root for your web site.  If you go to that directory and create a file called test.php, and put this into it,

<?php phpinfo(); ?>

You can then test the PHP5 install has worked by connecting to your web server and requesting the file test.php.  If it asks you to save it, something went wrong (or you didn’t restart Apache2), otherwise you should get a full list of the PHP settings.

NB: Debian installs Suhosin by default.  This should be okay, but it can cause issues with some features of WordPress and phpMyAdmin.

Install MySQL

The MySQL install is the most complex, because you’ll have to create a password!  Otherwise, it’s as simple as the above steps.  As well as MySQL we need to remember to install the PHP5 MySQL module, otherwise we won’t be able to interact with the database.

apt-get install mysql-server php5-mysql

After some packages are downloaded and installed, you’ll be asked to set a password for the MySQL root user.  The dialog says this is not mandatory.  I think it should be.  You should absolutely set this password.  It does not need to match the Linux root user password, and as in all cases, it should actually differ significantly.

Restart Apache2 for good measure, and you’re done.  MySQL will be started, the relevant libraries are installed, and Apache2 / PHP5 / MySQL can all communicate as required.

By default, MySQL won’t be listening on any external interfaces, which is a good thing, so only your website can communicate with it.  Some guides recommend installing phpMyAdmin at this point, and you can if you want, although I prefer not to.

Permissions

In a default Debian install, Apache2 and PHP5 run as the www-data user.  By default, the permissions on /var/www are

drwxr-xr-x root root

That means the web server can’t create any files or directories in /var/www.  That’s a problem when installing things like WordPress which want to create their own config files or .htaccess files.  Because we’re not worried about multiple users on our server, or different customers, it’s safe to set the owner of /var/www to www-data:www-data, and do the same for all files in that directory.  This advice is only true for a server where you don’t mind all the websites running as the same user, but that’s the point of this example anyway!

All In One

The following command will install the whole thing in one go, and all you need to do is set the MySQL password.

apt-get install apache2 apache2-mpm-prefork php5 libapache2-mod-php5 mysql-server php5-mysql

Follow Up Steps

Later on you might want to install additional PHP modules (such as php5-curl, php5-gd, php5-mcrypt), and for sites which you expect to be busy on servers with not much memory you might want to look at using apache2-mpm-worker and FastCGI.

Exim4 (SMTP MTA) + Debian + Masquerading

I love Debian, and Exim4 seems to ‘just work’ for me most of the time, so I tend to use it for my MTA by preference.  Debconf handles the basic options for Exim4 pretty well, and usually I don’t need to mess with anything.

However, on one of my VPS’s I wanted to do what I used to refer to as masquerading.  I use the term to refer to having an SMTP masquerade as a different host on outbound e-mail addresses automatically.  So the server may be fred.example.net, but all outgoing mail comes from user@example.net.  It’s common if you want to handle the return mail via some other route – and for me I do.  My servers are in the darkstorm.co.uk domain, but I don’t want them handling mail for somehostname.darkstorm.co.uk, and I don’t want to have to configure every user with a different address, I just wanted a simple way to get Exim to masquerade.  Additionally, I only want external outbound mail re-writing, mail which is staying on the server should remain untouched.  This allows bob to mail fred on the server, and fred to reply without the mail suddenly going off the server, but if bob mails bill@example.org, then his address is re-written correctly.

I think I spent some time looking at this a couple of years ago, and had the same experience as recently – it’s a bit frustrating tracking down the best place to do it.  Firstly, Exim doesn’t have a masquerade option as such, and the manual doesn’t refer to masquerading in that way.  What it does have is an extensive rewriting section in the config file and support for doing that rewriting in various ways.

On top of this, the Debian configuration of Exim can be a little daunting at first, and how you achieve the configuration may depend on whether you’re using a split config or the combined config.

Anyway, enough rambling, you can get Exim to rewrite outgoing mail / masquerade by setting one macro.  This works on Debian 6 (Squeeze) with Exim4, but I assume it’ll work with Exim4 on any Debian installation.

Create (or edit)

/etc/exim4/exim4.conf.localmacros

Add the following line,

REMOTE_SMTP_HEADERS_REWRITE = *@hostname.example.net ${1}@example.net

Rebuild the Exim config (might not be essential but I do it every time anyway),

update-exim4.conf

and then recycle Exim (reload might work, but I tend to recycle stuff),

/etc/init.d/exim4 restart

That same macro is used for both the single monolithic config file, and the split config file.  It tells Exim that for remote SMTP only, it should rewrite any header that matches the left part of the line with the replacement on the right.  The ${1} on the right matches the * on the left (multiple *’s can be matched with ${1}, ${2}, etc.)

You can supply multiple rules by separating them with colons, such as this,

REMOTE_SMTP_HEADERS_REWRITE = *@hostname.example.net ${1}@example.net : *@hostname ${1}@example.net : *@localhost ${1}@example.net

There are more flags you can provide to the rewrite rules, and you can place rewrites in other locations, but the above will achieve the basic desire of ignoring locally delivered mail, but rewriting all headers on outbound e-mail which match.

Full details of Exim’s rewrite stuff is here.  Details about using Exim4 with Debian can be found in Debian’s Exim4 readme (which you can read online here).

I’m sure there are other ways of achieving this, there’s certainly an option in the debconf config (dc_hide_mailname) which seems hopeful, but it didn’t seem to do anything for me (maybe it only works when you’re using a smart relay?)  Either way, this option does what I wanted, and hey, this is UNIX, there’s always more than one way to skin a cat.

Edit: just had a look at the various Debian package files, and it looks like dc_hide_mailname only works if you’re using a smart relay option for Exim.  If you’re using the full internet host option from Debconf, it never asks you if you want to hide the mailname, and ignores that option when you rebuild the config files.

Debian, apache2, virtualhosts, FastCGI and PHP5

I’ve spent an amusing evening revisiting FastCGI under Apache2, in order to server PHP5 content through Apache’s threaded MPM (worker).  I set this up ages ago on my previous web server and then forgot about it.

It was fine for a long time, but I hadn’t really customised it and to be frank, wasn’t really sure what it was doing.  I just know at the time it was very confusing reading a lot of conflicting stuff on the web.  But it worked.  Until recently, when I noticed the server was running out of memory and processes were being killed.  I didn’t really spend much time looking at the cause though.

When I moved to the new server, I thought I’d try out the prefork MPM again, as per my previous posts and it seemed okay.  However, it’s not okay (although I may do some more load testing if I get a chance).  So I quickly switched back to the worker MPM and FastCGI.

Which is where I started getting frustrated again – I wanted to understand better what’s going on with FastCGI and make sure I was handling it correctly.

If you search the web, there’s a lot of stuff, much of it from 2007 – 2009 with conflicting information and stuff you might or might not need to do.

So, first some caveats,

  1. this is Debian Squeeze, other distributions might be different.
  2. I run PHP5 under FastCGI and nothing else, so my config changes only affect PHP5.
  3. I’m guessing about most of this stuff – so if I’m wrong, please feel free to provide constructive comments.

Here’s what I learned.

Two FastCGI Modules?

Debian comes with two FastCGI modules, those being libapache2-mod-fcgid and libapache2-mod-fastcgi.  They are binary compatible, I’m lead to believe, but fcgid is newer and works better with suexec.  So you should use libapache2-mod-fcgid unless you know you need libapache2-mod-fastcgi for some specific reason.  If you read examples talking about libapache2-mod-fastcgi you can probably just use libapache2-mod-fcgid instead.

Don’t install them both at once – you can do, but there’s no point and it’ll only cause confusion.  You only need one.

Some Fcgid settings are per virtual host.

I run with a low memory setup, so I wanted the PHP5 processes to shut down after a while, rather than hang around.  I couldn’t work out why they weren’t going away.  Also, I couldn’t work out why there were so many.  But it looks to me like you get at least one PHP5 process per virtual host, sometimes more (if the load is high, but remember, these are mostly vanity VPS’s, low load).  The default settings for fcgid processes is to start with none, and create as many as needed, and then drop back to 3.  But it looks like with the way I’ve got it configured (maybe all ways), that’s per virtual host.  I had to set the FcgidMinProcessesPerClass to be 0, so that on each virtual host, fcgid will close all the unused PHP5 processes after a while.

Wrappers?

Most of the articles online suggest you write a little wrapper to launch your PHP5 stuff via Fast CGI.  I couldn’t remember doing that on the previous server and spent a while looking for my wrapper script – until I realised I’d not created one.  You don’t need a wrapper script, but you do need to tell your virtual host to run PHP5 code using the Fast CGI module.  I have this in each of my virtualhost Apache2 config sections.

AddHandler fcgid-script .php
FCGIWrapper /usr/lib/cgi-bin/php5 .php
Options ExecCGI

You need to add the ExecCGI to the Options directive to ensure the PHP pages can be run as CGI apps, and the Handler and FCGIWrapper lines tell Apache2 how to run the PHP.  The default wrapper is just the PHP5 CGI binary (as shown above).  You can put a shell script there and set some defaults, but you don’t have to, it ran fine for over a year on my other server without doing so.

You can set values in fcgid.conf

Because I’m only running PHP5 stuff via Fast CGI, I can happily put settings in Apache’s fcgid.conf file.  Some articles suggest creating a PHP specific one, and putting the wrapper script stuff above in that as well.  I’m sure that works, but so does the way I did it (there’s always more than one way!).  Here’s my fcgid.conf,

<IfModule mod_fcgid.c>
 AddHandler    fcgid-script .fcgi
 FcgidConnectTimeout 20
 FcgidIOTimeout              60
 FcgidMaxRequestsPerProcess  400
 FcgidIdleTimeout            60
 FcgidMinProcessesPerClass   0
</IfModule>

The two Timeout entries ensure unused PHP5 processes are closed down.  The MinProcessesPerClass is required as mentioned above, otherwise it defaults to 3 per virtualhost.  The MaxRequestsPerProcess I’ve set at 400.  PHP will by default handle 500 and then shutdown, it can do that even if Fast CGI has already made a connection, resulting in a 500 error at the client.  If you force Fast CGI to stop PHP after <500 requests, you avoid that issue.  You can if you want write a PHP Wrapper script, and increase PHP’s max requests value, but you don’t have to.

There’s always another way

This is one way of setting it up, there’s always another way, and with Linux there’s usually another 10 ways.  I may do some more testing to narrow down some confusion I still have and see what the benefits of wrapper scripts may or may not be, and whether it’s worth moving some of the per-virtualhost config entries into the fcgid.conf file (like the handler bits).

Virtual Machines – taking the pain out of major upgrades

If your computers are physical machines, where each piece of hardware runs a single OS image, then upgrading that OS image puts your services at risk or makes them unavailable for a period of time.

Sure, you have a development and test environment, where you can prove the process, but those machines cost money.  So processes develop to either ensure you have a good backout, or you can make changes you know will work.

Virtual Machines have changed the game.  I have a couple of Linux (Debian) based VM’s.  They’re piddly little things that run some websites and a news server.  They’re basically vanity VM’s, I don’t need them.  I could get away with shared hosting, but I like having servers I can play with.  It keeps my UNIX skills sharp, and let’s me learn new skills.

Debian have just released v6 (Squeeze).  Debian’s release schedule is slow, but very controlled and it leads to hopefully, very stable servers.  Rather than constantly update packages like you might find with other Linux distributions, Debian restricts updates to security patches only, and then every few years a new major release is made.

This is excellent, but it does introduce a lot of change in one go when you move from one release of Debian to the next.  A lot of new features arrive, configuration files change in significant ways and you have to be careful with the upgrade process as a result.

For matrix (the VM that runs my news server), I took the plunge and ran through the upgrade.  It mostly worked fine, although services were out for a couple of hours.  I had to recompile some additional stuff not included in Debian, and had to learn a little bit about new options and features in some applications.  Because the service is down, you’re doing that kind of thing in a reasonably pressured environment.  But in the end, the upgrade was a success.

However, the tidy neat freak inside me knows that spread over that server are config files missing default options, or old copies of config files lying round I need to clean up; legacy stuff that is supported but depreciated sitting around just waiting to bite me in obscure ways later on.

So I decided to take a different approach with yoda (the server that runs most of the websites).  I don’t need any additional hardware to run another server, it’s a VM.  Gandi can provision one in about 8 minutes.  So, I ordered a new clean Debian 6 VM.  I set about installing the packages I needed, and making the config changes to support my web sites.

All told, that took about 4 hours.  That’s still less time than the effort required to do an upgrade.

I structure the data on the web server in such a way that it’s easy to migrate (after lessons learned moving from Gradwell to 1and1 and then finally to Gandi), so I can migrate an entire website from one server to another in about 5 minutes, plus the time it takes for the DNS changes to propagate.

Now I have a nice clean server, running a fresh copy of Debian Squeeze without any of the confusion or trouble that can come from upgrades.  I can migrate services across at my leisure, in a controlled way, and learn anything I need to about new features as I go (for example, I’ve switched away from Apache’s worker MPM and back to the prefork MPM).

Once the migration is done, I can shut down the old VM.  I only pay Gandi for the hours or days that I have the extra VM running.  There’s no risk to the services, if they fail on the new server I can just revert to providing them from the old.

Virtual Machines mean I don’t have to do upgrades in place, but equally I don’t have to have a lot of hardware assets knocking around just to support infrequent upgrades like this.

There are issues of course, one of the reasons I didn’t do this with matrix is that it has a lot of data present, and no trivial way to migrate it.  Additionally, other servers using matrix are likely to have cached IP details beyond the content of DNS, which makes it less easy to move to a new image.  But overall, I think the flexibility of VM’s certainly brings another aspect to major upgrades.

Debian / IPv6 / ip6tables / arno-iptables-firewall

Gandi turned IPv6 on, on my virtual host and I’ve been playing catch up ever since.  I’d not spent much time looking at IPv6 other than a cursory glance and I sort of knew the basics.  But once they’d switched it on I had to put in a little bit of reading time.

Did I want the same hostname to resolve to both the IPv4 and IPv6 address, or did I want to use a different hostname for each?  What was I going to do about firewalls?  And a few other things.

Because the iptables documentation makes my brain bleed, I use an out-of-the-box firewall tool (arno-iptables-firewall) which I’ve found extremely useful.  However, the Debian stable version doesn’t support IPv6 configurations.

That left me with three choices.  Try and work out an ip6tables setup for myself, grab a different firewall product, or backport the latest version of arno-iptables-firewall to Debian Squeeze.  Backporting seemed like the most interesting option – so I did that.

Surprisingly it wasn’t as hard as I expected, although I did have to learn a bunch of Debian Package Management terminology in very short notice.  This post helped a ton.  Up until this point, IPv6 access to the server had been working fine, because there was nothing in the way 😉 A couple of connections with other servers had started using the IPv6 and I wanted to retain those.

I checked the config for the firewall, and restarted it.  Everything seemed okay.  However a few days later, another sysadmin got in touch and told me they could no longer get to the server on it’s IPv6 address.  It turned out I could, but only from another server on the same network, and after a little digging and investigation it became clear the issue was routing.

Turning the firewall on and off didn’t fix it, but it seemed like rebooting got it working, and as soon as I started arno-iptables-firewall the problem came back.  So, I stopped using the firewall for IPv6 and everything was okay.  Until overnight the problem came back on it’s own.

One of the key things about IPv6 is that it relies on ICMPv6 far more than IPv4 did.  One of the most important things, is that ICMP is used to do Neighbor Discovery.

Although the arno-iptables-firewall setup was set to allow ICMP through, I had missed one critical setting.  Gandi uses IPv6 stateless autoconfiguration to provide IPv6 information to the host.  This means the host continues to check how to route traffic.  The missed config stopped this information from arriving at the host, and as a result, the essential route to the outside world expired from the routing table.

If you’re uisng arno-iptables-firewall v2.0.0a, and your server uses stateless autoconfiguration, make sure you set the following two options,

# Only disable this if you're NOT using forwarding (required for NAT etc.) for
# increased security.
# Note: If enabled and IPV6 enabled, local IPv6 autoconf will be disabled.
# -----------------------------------------------------------------------------
IP_FORWARDING=0
# (EXPERT SETTING!) Only disable this if IP_FORWARDING is disabled and
# you do not use autoconf to obtain your IPv6 address.
# Note: This is ignored if IP_FORWARDING is enabled. (IPv6 Only)
# -----------------------------------------------------------------------------
IPV6_AUTO_CONFIGURATION=1

By default, IP_FORWARDING will be set to 1, and that stops the IPV6_AUTO_CONFIGURATION setting from taking effect.  Once I switched IP_FORWARDING to 0, the route came back and everything has been fine since.


Custom Logwatch script for ngIRCd

So before I begin (or technically, just after I’ve begun), let me remind you that my perl skills are shockingly bad.  All my perl scripts are written in the same style as the script I was copying from at the time I wrote them.

Introduction

I’ve recently set up an IRC server, partly to mess about with it and partly to consider using it to keep in touch with friends.  I’m acutely aware that it’s the kind of thing that gets attacked, so I’ve made sure ngIRCd (the daemon I chose) is logging everything, and then I started looking for a logwatch (homepage) script to monitor the logs and alert me of anything suspicious going on.

Sadly, I couldn’t find one, so I decided to do the only sensible thing and write my own, which is fine, but as you’ll see if you search the web for ‘writing custom logwatch scripts’, it’s sort of both easy and hard.  It’s easy once all the bits fall into place, but sometimes the terminology gets in the way.  So, here’s how I did it.

Detail

You absolutely need two files, one which describes which logs you’re going to handle, and another which is the script which does the handling.  You should name them in some way which makes sense (after the service you’re monitoring for example).  Once you put them in the right place, logwatch will execute your script and you’re away.  There are some optional files, if you want to do some logfile pre-processing (I think) but as I never used those, I can’t comment.

So, I want to monitor ngIRCd which on my server logs everything it does to /var/log/messages under the service name ngircd.  Here’s an example line,

[sourcecode language=”plain” gutter=”false”]
Aug 13 08:01:54 hostname ngircd[10898]: User "bob!~ident@some.machine" registered (connection 8).
[/sourcecode]

The first thing I did was create a file describing which logs to monitor and how to filter the data, and I stole various bits of information from the other files distributed with logwatch.  I called my file ngircd.conf and place it in,

[sourcecode language=”plain” gutter=”false”]
/etc/logwatch/conf/services/
[/sourcecode]

That’s the default location on Debian.  Here’s the content of my file with some comments,

[sourcecode language=”bash”]
# set the title for the reports
Title = "ngIRCd"
# set the logfile to the messages log file *group*
LogFile = messages
# only return entries made by ngIRCd which reduces our effort in the script
*OnlyService = ngircd
# remove the date / time stamp, hostname, service name, etc.
*RemoveHeaders
[/sourcecode]

Line 3 is important and took me a little while to work out.  In the config file for your service, you describe the log file group that is used, which in turn tells logwatch which file in the /logfiles/ directory structure describes the actual log files which are scanned.  So the above line tells logwatch (in the case of Debian) to use the log files described in /usr/share/logwatch/default.conf/logfiles/messages.conf.  That file handles the log file names, how to deal with date/time stamps, archived logs, etc.

If the log files for your new service don’t already have a matching log file group configuration file, you should create one in /etc/logwatch/conf/logfiles, using an example from /usr/share/logwatch/default.conf/logfiles.  Anyway, in my case, since I was using /var/log/messages which is already described in /usr/share/logwatch/default.conf/logfiles/messages.conf I didn’t need to create one.

Now that you’ve got the service configuration covered, you need a script, and it needs to be named after the config file (so if you call your config file foo.conf, then your script needs to be called foo).  You can write this script in any language that can read from STDIN and write to STDOUT, but like other folk before me I made the joyful error of sticking to perl.

You place this file in

[sourcecode language=”plain” gutter=”false”]
/etc/logwatch/scripts/services
[/sourcecode]

The important things to remember are,

  1. your script will receive the content of the appropriate logs via STDIN
  2. it should write output to STDOUT and should use the environment variable LOGWATCH_DETAIL_LEVEL to determine the detail level passed to the logwatch program
  3. the output should be tidy and should avoid being verbose
  4. if you’ve configured the service conf script correctly you won’t need to worry about parsing dates, stripping headers, or other rubbish.  This does depend on the log file in question though and the application.
  5. To keep in line with other scripts, you should capture everything you know you don’t care about and ignore it, process stuff you do care about, and report stuff you don’t recognise.

The link below is the script I cobbled together to handle ngIRCd so far.  At the moment, I ignore my own advice and don’t check the detail level, I just wanted initially to get my data out.  I have no idea if the regexp’s are correct or efficient, but at present, it displays what I care about. Is that enough caveats?  I’m not looking for feedback on the quality of my perl! I’m just trying to show how it can be done.

ngircd

[sourcecode language=”perl”]
#!/usr/bin/perl
##########################################################################
# ngircd
##########################################################################

use Logwatch ‘:all’;

my $Detail = $ENV{‘LOGWATCH_DETAIL_LEVEL’} || 0;
my $Debug = $ENV{‘LOGWATCH_DEBUG’} || 0;

my %FailedLogin = ();
my %FailedOpers = ();
my $FailedOpCommands;
my %TriedConnections = ();
my %GoodConnectionsi = ();
my %GoodOper = () ;
my %BadOpCommands = ();
my %OtherList = ();

if ( $Debug >= 5 ) {
print STDERR "\n\nDEBUG: Inside ngircd Filter \n\n";
$DebugCounter = 1;
}

while (defined(my $ThisLine = <STDIN>)) {
if ( $Debug >= 5 ) {
print STDERR "DEBUG($DebugCounter): $ThisLine";
$DebugCounter++;
}

chomp($ThisLine);
if ( # We don’t care about these
( $ThisLine =~ m/connection .* shutting down / ) or
( $ThisLine =~ m/^New TLSv1 connection using cipher/ ) or
( $ThisLine =~ m/^Now listening on/ ) or
( $ThisLine =~ m/^IO subsystem: epoll/ ) or
( $ThisLine =~ m/^Reading configuration from/ ) or
( $ThisLine =~ m/^ngircd .* started/ ) or
( $ThisLine =~ m/^Created pre-defined channel/ ) or
( $ThisLine =~ m/^Not running with changed root directory/ ) or
( $ThisLine =~ m/^Notice: Can’t change working directory to/ ) or
( $ThisLine =~ m/^getnameinfo: Can’t resolve address/ ) or
( $ThisLine =~ m/^Shutting down all listening sockets/ ) or
( $ThisLine =~ m/^ServerUID must not be 0, using/ ) or
( $ThisLine =~ m/^OpenSSL .* initialized/ ) or
( $ThisLine =~ m/^Configuration option .* not set/ ) or
( $ThisLine =~ m/^User .* unregistered/ ) or
( $ThisLine =~ m/^Server restarting NOW/ ) or
( $ThisLine =~ m/^Server going down NOW/ ) or
( $ThisLine =~ m/^Shutting down connection .* \(Got QUIT command\.\)/ ) or
( $ThisLine =~ m/^Connection .* with .* closed / ) or
( $ThisLine =~ m/^Running as user/ ) or
( $ThisLine =~ m/^Shutting down connection .* \(Server going down/ ) or
( $ThisLine =~ m/^Shutting down connection .* \(Socket closed/ ) or
( $ThisLine =~ m/^Shutting down connection .* \(Ping timeout/ ) or
( $ThisLine =~ m/is closing the connection/ ) or
( $ThisLine =~ m/^ngircd done/ ) or
( $ThisLine =~ m/^Client unregistered/ ) or
( $ThisLine =~ m/^Client .* unregistered/ ) or
( $ThisLine =~ m/^User .* changed nick/ )
) {
# We don’t care, do nothing
} elsif ( my ($Host) = ($ThisLine =~ /Accepted connection .* from ([\d\.]+)/ )) {
$TriedConnections{$Host}++;
} elsif ( my ($User,$Connection) = ($ThisLine =~ /^User \"([^ ]+)!([^ ]+)\" registered /)) {
$GoodConnections{$Connection}++;
} elsif ( my ($User,$Connection) = ($ThisLine =~ /^Got invalid OPER from \"([^ ]+)!([^ ]+)\": / )) {
$FailedOpers{$Connection}++;
} elsif ( my ($User,$Connection) = ($ThisLine =~ /^No privileges: client \"([^ ]+)!([^ ]+)\", command / )) {
$BadOpCommands{$Connection}++;
} elsif ( my ($Host) = ($ThisLine =~ /^Shutting down connection .* \(Bad password\) with ([^ ]*):/)) {
$FailedLogin{$Host}++;
} elsif ( my ($User,$Connection) = ($ThisLine =~ /^Got valid OPER from \"([^ ]+)!([^ ]+)\", user is an IRC operator now/ )) {
$GoodOper{$Connection}++;
} else {
# Report any unmatched entries…
$OtherList{$ThisLine}++;
}
}

#######################################################

if (keys %BadOpCommands) {
print "\nIRCOp commands from regular users:\n";
foreach my $key (keys %BadOpCommands) {
my $totcount = 0;
$totcount += $BadOpCommands{$key};
my $plural = ($totcount > 1) ? "s" : "";
print " $key: $totcount time$plural\n";
}
}

if (keys %FailedLogin) {
print "\nFailed logins from:\n";
foreach my $key (keys %FailedLogin) {
my $totcount = 0;
$totcount += $FailedLogin{$key};
my $plural = ($totcount > 1) ? "s" : "";
print " $key: $totcount time$plural\n";
}
}

if (keys %FailedOpers) {
print "\nFailed attempts to become IRCOps from:\n";
foreach my $key (keys %FailedOpers) {
my $totcount = 0;
$totcount += $FailedOpers{$key};
my $plural = ($totcount > 1) ? "s" : "";
print " $key: $totcount time$plural\n";
}
}

if (keys %GoodOper) {
print "\nGood attempts to become IRCOps from:\n";
foreach my $key (keys %GoodOper) {
my $totcount = 0;
$totcount += $GoodOper{$key};
my $plural = ($totcount > 1) ? "s" : "";
print " $key: $totcount time$plural\n";
}
}

if (keys %TriedConnections) {
print "\nAttempted connections from:\n";
foreach my $ip (sort SortIP keys %TriedConnections) {
my $name = LookupIP($ip);
my $totcount = 0;
$totcount += $TriedConnections{$ip};
my $plural = ($totcount > 1) ? "s" : "";
print " $name: $totcount time$plural\n";
}
}

if (keys %GoodConnections) {
print "\nGood connections from:\n";
foreach my $key (keys %GoodConnections) {
my $totcount = 0;
$totcount += $GoodConnections{$key};
my $plural = ($totcount > 1) ? "s" : "";
print " $key: $totcount time$plural\n";
}
}

if (keys %OtherList) {
print "\n**Unmatched Entries**\n";
foreach $line (sort {$OtherList{$b}<=>$OtherList{$a} } keys %OtherList) {
print " $line: $OtherList{$line} Time(s)\n";
}
}

exit(0);
[/sourcecode]

If I have the inclination, I plan to update this to display different levels of detail based on the logwatch detail option, format the output a little nicer, handle some different bits of information and split the input lines up into more fields.  But you know, now it does 90% of what I want, that might never happen.

Summary

  • Pick a name (based on the service you’re reporting on)
  • Create /etc/logwatch/conf/services/myname.conf and describe the log file group to use, and any other options
  • Create a script /etc/logwatch/scripts/services/myname in your favourite language and parse STDIN, sending useful information to STDOUT
  • Bingo