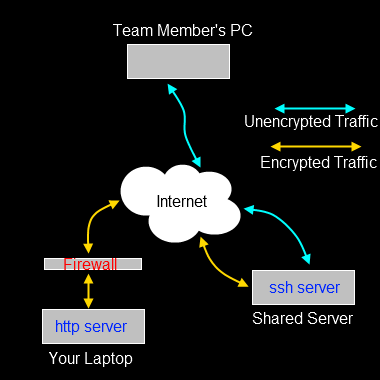
The first three parts of this series (one, two, three) covered using SSH to tunnel across various combinations of firewalls and other hops in a forward direction. By that, I mean you are using computer A and you’re trying to get to something on computer B or computer C. There is another type of problem that SSH tunnels can solve. What if you’re running a service on computer A but you can’t get to it because your network doesn’t allow any incoming connections? Maybe it’s a home server behind a NAT router and you can’t / don’t want to poke holes in the firewall? Maybe you’re in a cafe and no one can connect to your machine because the free wireless doesn’t allow it, but you want to share something on your local web server?
In those situations, you need reverse tunnels (or remote tunnels). There’s nothing magical about them, they just move traffic in the other direction while still being initiated from the same starting location.
Example 4 – reverse tunnel web server
In this example, we’ll use a reverse web tunnel to enable access to a host for which incoming connections are entirely blocked. You’re sitting with your laptop in a cafe, doing some work, and you want to show some team mates the new web site layout. Rather than having to check the code out to a public web server, you can just allow access to the web server you run on your local machine.
The assumption here is that you can SSH into the Shared Server and that your team mate can connect to the SSH server with their web browser.
Your team mate can’t browse to the web server on your laptop, because the cafe firewall quite sensibly gets in the way. What we need is a way to allow traffic from the SSH server into your laptop.
From your laptop, you create a reverse / remote tunnel (note -R, rather than -L),
ssh -R 203.0.113.34:9090:127.0.0.1:80 fred@203.0.113.34
I’ve used IP addresses in the tunnel so you can see what is going on. With regular tunnels, the first IP address and port are the local machine. With reverse tunnels, they are the interface and port on the remote server that are listening for traffic, the second IP address and port are the ones on the local machine to which that traffic is routed. So our reverse route above connects to the ssh server (203.0.113.34) and starts listening on that network interface (203.0.113.34) port 9090. Any traffic it gets on that port is routed over the tunnel into 127.0.0.1 port 80 (i.e. your local machine, port 80).
Your team mate can now point their browser at 203.0.113.34:9090 and will actually see the web server on your laptop. Because you created an outgoing connection through the firewall with the tunnel, the firewall is none-the-wiser, it simply sees regular SSH traffic flowing to and from the SSH server.
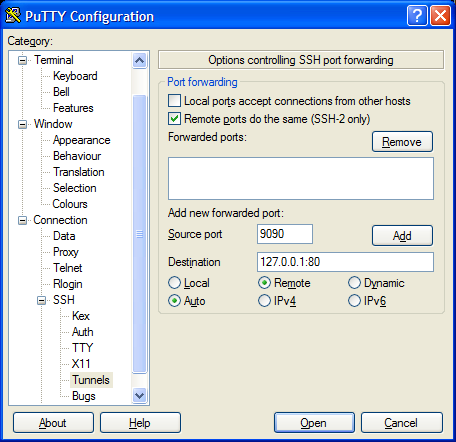
In PuTTY the setup would look like this,
The Remote ports option needs to be ticked so that the tunnel will listen to external interfaces on the target machine.
NB: In order to get reverse (or remote) tunnels working in this way, you need to ensure the SSH server to which you connect supports the feature. For OpenSSH that means you need to enable the ‘Gateway Ports’ open in the sshd_config file.


I have found the series on SSH tunnelling fascinating.
Thanks 🙂